Let’s be honest — direct-to-garment (DTG) printing isn’t always straightforward; there are just a few unforeseen variables. In this article, you’ll learn a relatively simple way to mitigate them and find some comfortable consistency in your production process.
It all starts with pre-production, and there are three steps that are important for success. They include:
• Ensuring a perfect nozzle check
• Using a quality, ring-spun garment
• Proper pretreatment
• Simple, right?
A perfect nozzle check obviously is critical, as all nozzles need to be clear and firing properly for the best possible print. To get a perfect nozzle check, you must perform preventative and scheduled maintenance.

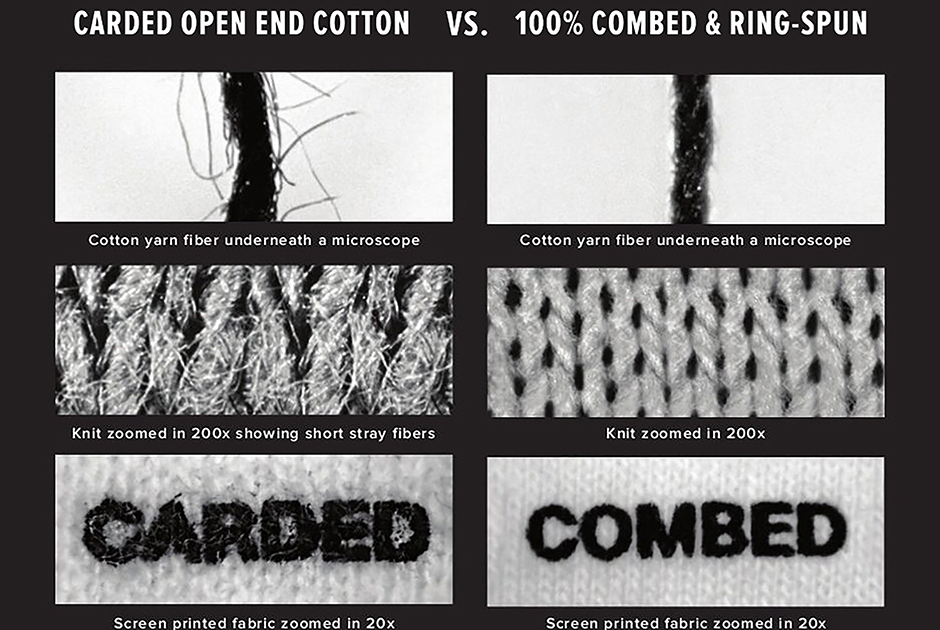
No Nozzle Clogging
Each DTG printer brand has a different maintenance procedure and protocol. Quite frankly, some printers require exorbitant amounts of maintenance, and if that’s the case, it’s hard to argue whether such a printer is even a viable option for running a profitable business.
If you happen to own such a printer and find that you’re spending the majority of your day cleaning, diagnosing and troubleshooting issues, you should research and invest in a printer that actually works. After all, you should want a printer that actually works as it should.
The concept of DTG maintenance is pretty simple; essentially, keep the white ink from clogging the print head. Again, each printer has a process to mitigate this occurrence, but if left unchecked, the white ink in any printer eventually will clog. So do your scheduled maintenance and keep your white-ink print heads happy.
Depending on your printer, the first step can be the most complicated one. Not all DTG printers are created equally and if you are struggling keeping those print heads happy, equipment quality — or lack thereof — could be the culprit.
The Garment Matters
The second step is the simplest, but everyone loves to complicate it. The water-based ink that’s used in the DTG-decorating process is somewhat translucent and vicious. White ink, particularly, is inherently thick and sticky because it’s made of titanium dioxide — the main component in everything that is white.
In good printers, white ink is specially formulated to flow through small printhead nozzles. Unlike screen printing, where a ton of white ink can be laid down through low-mesh-count screens and flooded onto a shirt, DTG printing uses considerably less and thinner white ink. Therefore, it must be printed on a fabric that is most conducive to its application.
Carded, open-end (COE) cotton is fibrous and loosely woven. This means viscous ink will have trouble holding fast on the yarn. Combed, ring-spun cotton is a tight yarn with a tight weave, and will result in a cleaner print.
Garment dye also has a lot to do with DTG-printing results. When cured using a heat press, color vibrancy often is lost. This is categorized as dye migration, where the garment’s dye migrates through the ink and dulls the image. This is common on polyester garments, but also occurs on budget, blank 100% cotton garments that often use COE yarn. Inexpensive dye usually is made with animal byproducts and these inexpensive dyes are notorious for dye migration — even on 100% cotton shirts.
Combed, ring-spun garments often use a better-quality dye. The combination of a tightly woven yarn and high-quality dye will yield exponentially better results when it comes to DTG printing.
Pretreatment Basics
Pretreatment solution works best on combed, ring-spun garments, too. To get decent results on poor-quality garments, multiple pretreatment applications are needed. This is time consuming and expensive. I prefer to pretreat once and be done.
The general rule for pretreating is to ensure a good spray pattern, meaning there are no clogs in the spray lines, and lay down the proper amount of solution for the shirt color on which you are printing.
Let’s examine the first part of the process: ensuring a good spray pattern. Similar to ensuring a proper nozzle check on your DTG printer, a pretreatment machine must be clean to avoid clogs. Pretreatment solution acts like liquified Elmer’s glue; if it dries in a machine’s lines, it will stick to everything and clog. Never let that happen.
You can clean pretreatment-machine lines with a quart of distilled water a 1/2 cup of Simple Green all-purpose cleaner. This will break down the pretreatment buildup, allowing the solution to flow freely. Don’t take this step lightly. In addition to cleaning the machine’s lines, remember to remove the nozzles and pretreatment-line filters and clean them regularly.
If you’re frustrated with the less-than-optimal results you’re getting with your DTG printer, following the aforementioned three steps should help make your prints more consistent and, ultimately, lucrative.
Honestly evaluate your process and your equipment; if you need a new printer, buy one. If you’re using shirts made of COE cotton, switch to the ring-spun variety. If you’re experiencing pretreatment problems, make sure you clean your machine’s lines.
DTG printing is in extremely high demand; give the people what they want and make money while doing it.
John LeDrew is the DTG director for Melco Intl. He has worked professionally in garment decoration since 2006, managing accounts and overseeing production for some of the world’s largest brands and retailers. For more information or to comment on this article, contact John via LinkedIn.


