Using a digital direct-to-garment (DTG) printer to decorate on headwear allows you to offer more options to your customers and increase your business. While embroidered caps indeed look great and often are preferred, budgets don’t always allow for digitizing costs. Embroidery also is limited by the thread colors available and is not ideal for detailed or photographic artwork.
Screen printing on caps can be tricky without the right equipment, and there’s the added cost of creating a separate screen for every color. Unless a high-enough quantity is needed, screen printing often is not an option for budget-conscious customers.
DTG printing offers several advantages for fulfilling short-run orders and adding personalization. While the per-cap cost of decorating with digital DTG printing is higher, customers can get a few caps done and pay only for the number they really wanted — often at a total price that’s less than the other two decorating techniques.
It’s also easy to put a different person’s name or location on every cap — a service that usually isn’t feasible with screen printing or embroidery. Caps can be printed digitally with no color restrictions and with greater detail.

Choosing a Cap
Caps come in two styles: structured and unstructured. The former has a piece of stiff buckram behind the two front panels to hold its shape, which creates a billboard area for decorating the cap. With the appropriate cap platen, it can be adjusted to create a flat-enough surface for printing.
With an unstructured cap, all six panels are the same. This style is easy to flatten and affix to a cap platen.
In terms of fabrics, digital DTG printing works best on cotton and other natural fibers. Polyester caps can be printed as well, but plan on a longer production time. Also, be aware that some caps may have a waterproof or stain-resistant coating, and this prevents the water-based DTG ink from bonding to the cap.
Curing
There are three ways to cure a digitally printed cap. The first is a cap heat press, which comes with a curved platen that fits the cap’s shape. There’s a selection of cap platens that will fit most headwear shapes.
The second way to cure a digitally printed cap is by using a conveyor dryer. There are small conveyor dryers specifically designed for caps, or you always can use a regular T-shirt
conveyor dryer.
Finally, you can use a heat gun. This would be an ideal option for small runs. For higher production, the heat press or conveyor dryer are much faster options.
The temperature used to cure digitally printed caps is important. In some cases, the cap’s bill will be made of plastic. If you expose it to too much high heat, you could end up with a distorted bill. Be sure to ask your supplier about the recommended time and heat settings for the curing technique you decide to use.
The Process
Step 1: Apply pretreatment to the cap area being printed. The amount of pretreatment will vary based on the cap material. Consult your supplier or do testing in advance to determine the right amount. Pretreatment can be applied using a spray bottle or a pretreatment machine, but it must be cured before printing. Use the same method to dry the pretreatment as you use to dry the inks.
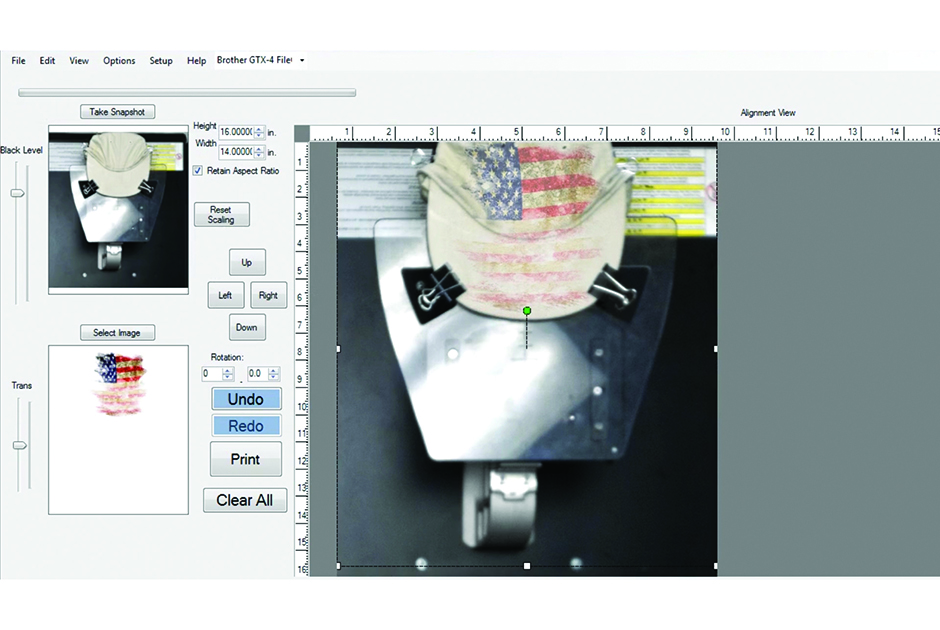
Step 2: Load the blank, pretreated cap on the cap platen by flipping the sweatband down and sliding it under the front lip of the riser. Use the vertical line on the cap platen for alignment and then secure the bill using black clips that may be included with the platen. Pull the cap’s crown over the riser and secure it to the back of the platen, flattening the cap as much as possible.
Step 3: Ensure the design is in the right place before printing by using the included artwork template for the cap platen or a camera system. Select the desired print settings, send the print file to the DTG printer and press the green button. After printing is done, cure the ink.
As you can see, regardless of whether you’re a screen printer or an embroiderer, digitally printing on caps is easier and faster than most other methods. By adding this capability, you can sell more caps by better meeting your customers’ needs.
Elliot Evans is manager of marketing operations in the industrial products division at Brother Intl. Corp. His background in project management and digital marketing have spanned several industries, with a strong focus on customer education. For more information or to comment on this article, email Elliot at [email protected].


