Many times, when using white ink in direct-to-garment (DTG) printing, I’ve noticed decorators’ tendency to complain that their prints just don’t look like what they saw at a trade show. “It just isn’t white enough and we are doing exactly the same artwork and everything — there must be something wrong with the printer or pretreatment machine,” they’ll exclaim.
Well, it’s important to remember there are many factors that can affect the final output of a digitally printed shirt. One of the biggest is the one you probably wouldn’t think of first: the choice of garment.
While it’s probably a popular culprit for a poor white-ink print, let’s first look at the role of pretreatment in digital printing and then examine how other factors come into play.
Pretreatment’s Role
Pretreatment achieves two basic functions for the digital printing process. The first is similar to the process of applying primer to drywall before painting. Primer is applied so that the paint doesn’t soak into the drywall. This is the same function that pretreatment serves for digital garment printing.
Secondly, once white ink is printed onto a pretreated shirt, it reacts with the pretreatment and changes “state”. You can think of this “state change” as being similar to the flashing of white ink in the screen printing process. A white underbase is flashed using a heat source so that a solid color can be printed on top of the white ink layer without a mixture of the two occurring. This results in a crisp, clean image. In direct-to-garment printing, when the white ink hits the pretreated shirt, the pretreatment “flashes” via a chemical reaction. Similarly, this allows other colors to be printed on a semi-solid surface, resulting in great detail and no messy or blurry wet-on-wet printing.
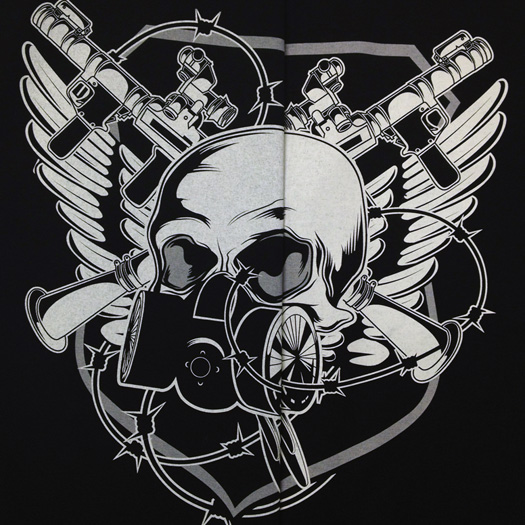
When using the same pretreatment process, printing parameters and artwork on multiple garments, it still is possible to get amazingly different printed results. In the above picture, two different shirts are folded down the middle to highlight the difference in printing that can be seen in real-world production. There is a significant difference in the brightness and opacity of the printed garment on the right when compared to the garment on the left.

The print on the left showed more fibrillation and less optical brightness, making the printed design look slightly faded and not as white. The print on the right appears to contain more solid, thicker deposit of white ink. However, the only difference between the left and right prints — and one of the most often overlooked variables — is the style of shirt.
Choosing a ‘Good’ Garment
For most DTG printing shops, increasing garment quality can have a profound impact on the print quality received by customers. Moreover, it doesn’t matter whether it is a standard CMYK-only print on a white shirt or white ink on a dark-colored shirt. The better the garment quality, the better the print and product your customers will receive.
What factors should be sought in a quality shirt? In the above example, the left side was a standard carded open-end (COE) fabric — a basic option most often found at the lowest price point. Since everyone wants to save money, this unfortunately is the most-often-chosen style for direct-to-garment printing.
The second — and better — choice for DTG printing would be a garment constructed of combed, ring-spun cotton, possibly also featuring an enzyme wash. The tighter weave of this type of shirt means there will be fewer rogue fibers straying from the thread, resulting in a smoother printing surface and a much better looking finished print.
A smaller thread diameter (such as a 30/1 thread) also will allow a much more denser weave with fewer peaks and valleys, while the enzyme-washing process will help strip off surface fuzz from the shirt fibers — resulting in a smoother printing surface.
You can think of the difference between these two shirt types (construction and processing) as being similar to printing a photograph with your desktop inkjet printer. Using regular copy paper may yield a good image, but printing on photo-quality paper can result in an incredible looking photograph. The same concept applies to DTG printing.
Test It Out
Every shop is different, and it is best to procure a variety of different ring-spun and processed shirts for testing. Many companies now advertise their shirts as DTG-ready. Since individual pretreatments and printing processes will interact differently with shirts based on where they are manufactured, it would be best to test multiple brands to find the shirt that will print the best in your shop.
So, the next time you are having issues with your white ink DTG prints and you want to blame the printer or the pretreatment machine, remember to check all the variables. Using the highest-quality shirt — though a little more costly than the standard shirt you may be using — will yield much better finished prints and more satisfied customers in the long run.
Brian Walker has owned his own screen printing business, developed quoting and pricing software and also launched a successful online direct-to-garment equipment and supply business. He currently is president of i-Group Technologies, makers of Viper pretreatment machines for the direct-to-garment industry. For more information or to comment on this article, email Brian at [email protected].


