
To the uninitiated, digitizing for machine embroidery seems like a process of simple conversion. For freshly minted beginners who find themselves looking into the task, it can quickly become a mind-boggling series of jargon terms, technical tools and trial-and-error experiments. The truth of what it means to interpret art into embroidery lies somewhere in the middle.
Though the highest level of artistic digitizing can take as much education as any other graphic art, quality work is attainable by anyone with adequate desire, dedication and curiosity. The process requires a blend of creative thinking and somewhat scientific attention to how changing variables affect outcomes when our digitized file meets the machine’s movement and the combination of fabric, thread and stabilizer for any given decoration.
By taking a look at what the process of digitizing actually entails, examining how we test designs and dispelling some common myths about what digitizing software does, we can be well on our way to developing the careful and creative mindset that defines the best digitizers in the business.
A Holistic Approach
Successful embroidery requires a “holistic” approach. Digitizing well and making the right decisions is dependent on understanding the materials we embroider and the way they respond to the stresses of the process. We should know how fabrics affect the quality of our stitching, as well as how our machines function and how our files drive them.

We need to know the proper application of stabilizers, needles, support materials, thread tension and machine operation, and how each alters our embroidery to ensure our expected outcome. In short, understanding embroidery is critical to digitizing. You’ll never get great results without well-digitized designs, but no design runs well without using the right materials in the right way. Though anyone can learn to digitize, experienced embroiderers have a head start toward becoming good digitizers, having learned how to prepare garments and run machines, as well as having watched how materials interact.
What does digitizing software do?
At its most basic, digitizing software allows you to create files that instruct embroidery machines where in the hoop and when in the sequence to place stitches and execute the various machine functions required to create a design.

From left: The original design, the prescribed stitch pattern and the final design. Images courtesy of Erich Campbell
Though this was once executed one stitch at a time, modern digitizing software allows you to create shapes via an object-based method very much like that used by vector graphics software, with the notable addition of embroidery-specific parameters applied on a shape-by-shape basis that fill each shape with stitches.
Digitizing software provides the tools not only to draw, but to assign and visualize stitch types, stitch length, stitch angle, density (spacing between lines of stitches that “fill” an area), entry and exit points for each shape, underlay (support stitching), and various other nuanced qualities that govern the look of a block of stitches and the behavior of the routines that fill shapes within them.
The Feature No Software (Really) Has
Despite the best attempts of great minds, digitizing software doesn’t automatically convert an image to a high-quality, efficient embroidery design without at least some additional input or refinement. Though it may happen soon, there’s no process at the time of this writing that can analyze an image and create a design that runs efficiently and keeps all outlines and shapes properly registered with the aesthetic quality and consistency provided by a skilled digitizer.
In particular, no current automation uses the material qualities of thread and the dimensional quality of embroidery to its best advantage. This isn’t to say automation hasn’t improved, nor that it can’t assist you in the creation of embroidery, but that the best quality embroidery is not attained by a one-click process.
At best, automation may help a digitizer create basic shapes or assign stitch values that are a reasonable starting place for editing and refinement when applied to simple images. At worst, it results in embroidery that runs poorly and betrays the lack of care taken in creation. Automation can help us handle simple tasks, but it can’t be counted on for highly detailed designs, subtle shading and details or the interpretation of photographic art into embroidery without compromise. It’s not a bad thing, but it’s also not a replacement for knowing how stitches work and actively choosing where they should go and how they should be configured.
Siren of the Screen
One of the chief problems new digitizers face is the fact that embroidery distorts during the stitching process. This unavoidable distortion means anything that looks perfect on-screen will look distorted at the machine.
The screen is misleading. Any shapes, registration of outlines and blocks of color or otherwise perfectly aligned lettering in your embroidery file will be distorted, out of registration or worse when it stitches. There are two critical lessons all digitizers should learn before they ever set a stitch:
1. All embroidery distorts, albeit to differing levels depending on the design, garment and stabilizer used. All stitches get slightly shorter under tension, meaning columns get narrower, borders thinner and fills pull back from their onscreen edges in what is known as “pull” distortion. Blocks of stitches, on the other hand, will expand in the angle perpendicular to the “stitch angle” at full coverage as the threads cinch down and flatten to a single layer in what is known as “push” distortion. We must therefore compensate for these forces in our interpretation of the art, increasing overlaps, thickening columns and “squashing” shapes.
2. The product of a digitizer is the embroidery, not the file. The file is a means to an end. What it looks like is immaterial if it doesn’t result in efficient, attractive embroidery on the intended garment.
Bottom line: Don’t let the look of the on-screen preview lead you astray. Focus on the stitches, not the file!
How Digitizing is Done
Understanding that digitizing is not simply a process of import and conversion, we can move on to what it really is: a process of determining the best way to represent a piece of art in the medium of thread and then creating an actual interpreted file with that in mind. The process ends only when a final embroidered sample can be reliably stitched on the intended garment in a method that is efficient, technically sound and aesthetically pleasing. What follows is a breakdown of the steps it takes to get from art to embroidery.
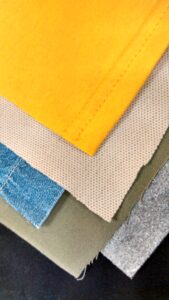
An understanding of fabric behavior is crucial to creating quality embroidery. Photo courtesy of Erich Campbell
Art Analysis: Interpreting art into stitches starts with the source. Digitizers import either a vector or raster graphic into their software, sizing it to the intended finished size of the decoration. Thread has set physical dimensions, making for relatively strict maximum and minimum sizes for certain stitch types to maintain quality and stitch correctly. This means scale is critical. The digitizer will review the art at scale, taking note of design elements poorly suited for embroidery and making suggestions to the customer for potential alterations. The digitizer will then secure approval from the customer for any necessary changes before creating the file.
Planning and Pre-Sequencing: With changes approved, the digitizer plans the sequence of elements in the design, thinking about their sequence and how they layer to enhance dimension and travel efficiently through the design. At this stage, a great digitizer will also consider sheen and texture of stitches, contemplating ways to showcase the qualities of embroidery through subdividing the shapes, order and stitch angles in the design.
Digitizing Proper: Having identified any changes and planned a sequence, the digitizer will proceed in one of two ways:
1. Vector Rework
With vector art, the digitizer may convert imported vector elements into embroidery elements, assigning stitch angles, settings, entry and exit points to each element. The digitizer will then rework the object sequence, optimizing travel and layering. As vector elements created for digital display or print will not be compensated for the natural stresses in embroidery, these shapes can create poor shape fidelity and registration issues if they remain unedited. Proper compensation, sequencing and overlapping must be added.
2. Traditional Digitizing
The second and more traditional way to work, whether the source is a vector or raster file, requires drawing embroidery shapes with the original image used as a backdrop. In this way, shapes are drawn with compensation for distortion and properly overlapped as necessary. Embroidery-specific shapes not present in the original art, can also be created to make the design more aesthetically pleasing in the thread created in sequence for efficient embroidery production.
Previewing: Once the drawing and assignment of stitch variables is complete, the digitizer previews the design, virtually replaying the stitch sequence in their software. Upon finding no elements either doubled or out of the intended order, the digitizer will output a machine file for final testing or “stitching out.”
Sampling: With the “finished” file ready, the digitizer (especially those in training) will sample their own design. Sampling should use a material and stabilizer combination matching that of the final intended garment as much as possible. Material thickness, texture, stretch and the contrast between the design and garment colors should match, thus providing a result that closely mimics what should happen in production.
While testing, the digitizer will watch the run and take note of any poor quality in stitching, missing or doubled elements, excessive backtracking, incorrect or excessive color changes, missing tie-in or tie-off stitches and any other inefficient or incorrect execution or unsatisfactory results in the interpretation. Any errors or quality issues can be addressed with an edit, after which the design is sampled again. If no errors are present, the sample and design are prepared for final customer approval.
A Note on ‘Watching’
The singular, best method for learning how embroidery works is watching embroidery run. This isn’t tacitly “checking in” on designs in progress. Watching means attending the entire stitching process with your eyes on the hoop. No experience is as immediately educational as seeing thread under tension pulling fabric, seeing a material’s surface texture move and change stitches of differing types and angles, seeing blocks of stitches alter each other as they collide. Watching makes you mindful of the physicality of the medium. Take it from an old embroiderer who started on machines without working thread-break sensors for whom being an operator meant walking the multi-heads with my hand floating over the emergency stops. Nothing helps you correct mistakes faster than seeing the process as it unfolds. Sometimes it’s the pain of a mismanaged run that teaches the most poignant lessons.
Isolating Design Problems
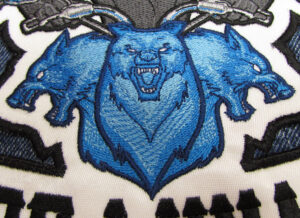
This design requires a range of different stitch types to create the desired effect. Photo courtesy of Erich Campbell
If quality is suffering or runs aren’t smooth and continuous, the question becomes whether the file, materials or equipment is behind the failure. It can sometimes be difficult to isolate the issue. Using an inadequate stabilizer for light fabrics or denser designs, for example, might result in registration issues as material and distorts.
Though you can mitigate a missed border by editing the design file to increase overlaps, using the proper stabilizer or slowing the machine might achieve a similar effect, depending on how far your outline misses its mark. You need a good understanding of materials, hooping and operation before assuming the worst of your digitizing. That said, there are ways to tell if digitizing caused, or can at least be used, to address a quality or running issue.
For example, file-based problems should recur at the same point in repeated tests.
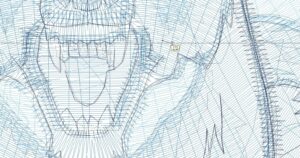
A closeup of the stitch patterns specified by the digitizer for the design above. Image courtesy of Erich Campbell
If, on the other hand, thread breaks are occurring randomly, problems with the thread, thread path or needle are the more likely culprits.
When a breakage reliably recurs, look for areas of overly short stitches, tightly packed detail or excessive densities that may be causing undue stress. The exception is when thread breaks are occurring over a problematic seam or garment structure, which may cause abrasion or snagging.
Other issues, like “escaped” underlay or gaps between borders and fills may have multiple contributing factors. If, for example, shifting isn’t regularly happening at the same location in the run or in the same direction, changes in the digitizing will be hard to target and unlikely to help, as edits usually only affect the altered area and files don’t change from run to run. If a fault isn’t regular, it’s likely not the fault of your digitizing, or at least not of your digitizing fault alone.
SMART Digitizing
Ultimately, the secret to editing and finalizing your design is to get “SMART.”
- Stitch your design using the proper materials, watching the run and noting problems.
- Measure registration errors or distortions that you need to correct in your sample.
- Analyze the way the problematic elements were created, determine why the errors occurred and strategize on how they can be fixed.
- Rework the design, compensating for the measured items that missed the mark by moving or reshaping the elements by the deviation you measured in the second step, taking your analysis into account.
- Test the alterations with another stitch-out, watching carefully for how your changes affected the outcome.
Done correctly, any basic design issue can be solved by repeating the SMART steps. Watching the design run reveals how stresses in the process affect the end result. One way to track these observations is to take notes on a printed preview copy of your design, circling areas that need attention. Measure gaps, elements that extend beyond borders, overly thin or thick areas and any distortions in the shapes.
Analyze problem areas to see how the construction of each object, the angle of the stitches or any garment related factors that might have caused the issue. Compare the measurements from your problem elements to those same elements in your digitized design. Correct widths, placement or spacing according to the deviations you noticed in measuring and analysis. If you are diligent with your trial and error and take clear notes, you’ll advance quickly, needing fewer and fewer SMART cycles to achieve the look you want and the operation you need.
Reaching the Finish Line
As complicated as all this may sound, the truth for the daily digitizer is that the process eventually becomes second nature. Where once you might have stopped to plan sequences or digitize small testing sections of detail to test an assumption about measurements or densities, experience soon finds you making these kinds of choices without a second thought.
With consistent work at scale, you’ll start to add the right amount of compensation to columns, provide the correct distance under borders, swing outlines past the end of push-distortion areas and sequence elements for efficiency automatically.
As hard as it can be to break the habit of slavishly following the lines in your source art, you’ll also eventually start making the necessary changes for thread behavior without question. Moreover, as these kinds of technical concerns are increasingly addressed by your personal digitizing “autopilot” you will find yourself having that much more time to spend on things like creating interesting textures; regulating how the contrast of adjacent stitch angles changes the play of light across the thread; interleaving lines of color to create blends; and manipulating layers in dimensional decorations.
Whatever you do, don’t be disheartened by any early difficulties you may encounter. Failure is not fatal. Just the opposite. Every mistake, when well-measured, will also serve to help you grow your skill.
Erich Campbell is an award-winning digitizer, embroidery columnist and educator, with more than 20 years’ experience both in production and the management of ecommerce properties. He is also the program manager for the commercial division of BriTon Leap. To reach Erich directly, go to his web site at erichcampbell.com.


