Are you looking for ways to save stitches but still produce top-notch embroidery with a good profit margin? Then appliqué may be the answer to your challenge.
(Editor’s Note: See attached photo gallery for images referenced in this article)
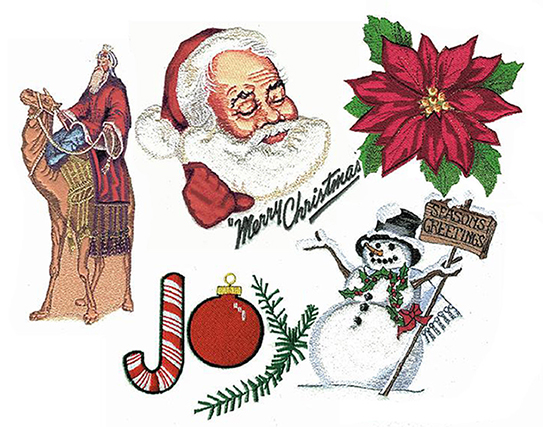
Appliqués can be as simple as what is seen in Image 1 and as complicated as what you see in the composite picture above. They can save stitches and add interest, and they should be a featured, not feared component of your embroidered designs.
An appliqué simply is a process of adding another piece of material to your garment. The process starts with the designation line, which is a running stitch outline of the area where you will place the piece of material. Once you have run that group of stitches, the frame or hoop should be programmed to come forward so that you can put your material in place without having your fingers under the needle.

You may have the fabric precut and use sticky spray to keep it in place. Or you can cut your pieces large enough to cover the area and leave room for trimming. In this case, a couple of pieces of masking tape will hold the fabric in place while you sew your next group of stitches without gumming up your needles.
In the traditional appliqué, your next group of stitches are designed to tack down the fabric so that you can add the final cover stitches. If you are not working with precut fabric, you will once again need a frame-forward command so you can trim the fabric without endangering your fingers.
Once the fabric is securely in place, you will then apply the finishing stitch that will cover any frayed material and clean up your edges. Image 2 shows each step in the process.
Although the usual stitches for this finish are the satin or column stitch, it is not necessary to limit yourself to only those stitches. As you can see in the Santa Claus image above, you also can use a fill or tatami stitch to finish designs and give them detail.
ADDING ELABORATENESS
Before we get into the more elaborate appliqué design, let’s go back to the simple appliqué that you see in Image 1. This is done with a piece of red fabric in the center and definitely will save you stitches. This same design fully stitched would involve several thousands of additional stitches and would limit your market.
However, what about the market that does not like the traditional appliqué look? Or what if you are trying to match shirts for a Little League team that has previously had fully stitched uniforms? The answer can be the appliqué with a light or transparent covering of stitches. It is easy to apply, will not move when washed or while you are stitching, and will look like the other team shirts.
Image 3 shows the same letter with the 4-inch appliqué, and Image 4 is the same appliqué with a light coverage of fill stitch. Image 4 includes only 2,746 more stitches than Image 3 and will solve the problem you may encounter when having to match team uniforms at a price that works for everyone.
An appliqué does not have to be a flat piece of material. However, it must have the ability to be laundered the same way in which you would launder the shirt it is on. Looking at the Santa (Image 5) and snowman in the composite, a white washcloth was used as the appliqué material for Santa’s beard, and another white washcloth for the body of the snowman. This adds both interest and texture.
The blue Christmas ball (Image 6) also has texture; this time a sheen. Notice how the stitches on top of it add to the shape and sheen of the ball. Again, appliqués do not have to be limited to the traditional and can be as elaborate as you wish.
In the case of these three pieces — Santa, the snowman and the blue Christmas ball — the fabric was cut after it was tacked down. You will need a sharp pair of scissors and will want to take the extra fabric and pull it up against the tack-down stitches. Use the very inside of your scissors, (the part that never gets dull) and strip away the extra fabric around the outside of the object.
Don’t be afraid of getting a few of the tack-down stitches when you remove the excess fabric; you will cover them up with your finish stitch. Make sure you program any detail inside the image to run before the final cover stitches. This gives you a chance to cover any of the excess stitches that may have wandered over the edge of the object.
Image 7 is one of my favorites. Here, you see the fabric with an elaborate pattern. We have laid it over the designation outline and stitched over the fabric with a light coverage of metallic thread. You can see how the printed image shows through and, in fact, looks like the print is embroidered. Followed by a little shading and the elaborate finish you would find on an old-fashioned Christmas ball, you have a gorgeous image that is sure to make your holidays shine. As complicated as this image appears, your time on the machine is limited and the perceived value is great.
So next time you hear the word appliqué, think simply beautiful and economical, too.
Lee Caroselli-Barnes, owner of Balboa Threadworks Embroidery Design, is known for her innovation and excellence in embroidery digitizing. She has 30 years of experience in the embroidery industry. For more information or to comment on this article, email Lee at [email protected]. Hear Lee speak on digitizing topics at the 2014 Imprinted Sportswear Shows (ISS). Reduced conference pricing is available if you pre-register: issshows.com.


