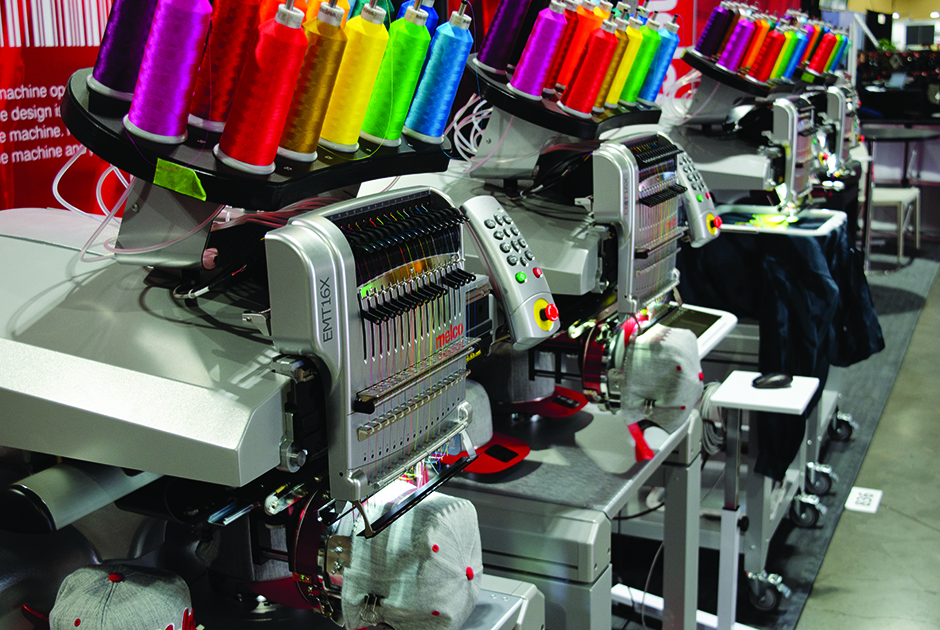
There’s nothing more frustrating than being under pressure to get a job out and having something go wrong—and there are so many things that can go wrong! No embroidery shop will ever be able to completely eliminate the things that cause machine downtime. However, a combination of education and experience will go a long way to not only reducing the frequency of these kinds of time-wasting issues, but get you back up and running as quickly as possible.
What follows are a few common embroidery snafus along with some advice from a number of industry veterans on how to fix them.
The problem: ‘Bird nests’
The cause: Typically, a bird nest results when the top thread does not properly engage with the bobbin thread because too much thread is being released. Consequently, instead of forming a neat stitch, the excess thread creates loops causing a tangled mess under the throat plate.
Making sure you have the right needles in place and that you change them out as needed will help prevent a host of production hassles. Photo courtesy of Impressions Expo
The solution: The one thing you don’t want to do, at least to start out, says Connie Smith, a consultant based in Lake George, New York, is tinker with the bobbin tension. Just the opposite, bobbin tension should be the last thing to check. “If you change the bobbin tension on one head, you are going to have to make sure it matches on all the other heads, otherwise they will not all sew the same,” Smith explains.

To fix the problem, Smith says, the first step is to remove the bird nest. “What you need is a sharp, long, thin-bladed knife. Slide the knife underneath the throat plate and gently saw back and forth. Once you have cut all the threads, you can gently remove the hoop.”
When picking out threads, always start from the end of the design, Smith says. That way when you come to a place where the threads overlap each other, you don’t have to dig through layers.
“I use curved scissors, tweezers, a straight pin or needle and clamps. Pick out threads one at a time. Try to grab a loop, but if it doesn’t come don’t force it. To get better access, use clamps to hold some of the tangled threads out of the way so you can reach the ones you are working on,” Smith explains.
To prevent the bird nest from happening again, she says, check your top tension. According to Smith, the looping is caused by excess thread moving too fast and is fixed by tightening the tension. Whenever you adjust tension, you want to do it in small increments and then do a test sewout.
“Start by tightening the topmost tension just a little. I suggest one to one-and-a-half turns. After testing, if it is still looping, go down to the next tension adjustment and do the same. Do not try to make the entire adjustment at only one tension position. If you don’t space it out over all the tension knobs, it messes up the thread path,” Smith says.
As an added tip, Smith suggests making sure you’ve got the same brand of thread on every head. “Thread manufacturers wind cones differently, so one brand is not going to behave the same as another, and this can result in inconsistent tension from head to head and cause problems,” Smith says.
The problem: Fixing a hole
The cause: Using the wrong needle or thread, too much tension or having a needle break can all create a hole in the garment.
The solution: “First, pick out all the loose threads,” says Smith. “Next, find a reject or a misprint shirt that is as close to the color of the damaged shirt as possible. For a 1/8-inch hole, you would cut a half-inch square from the patch material.”
After that, Smith says, get something like a kitchen towel and crush it into a ball. With the garment still in the hoop, lay the hoop on top of the fabric ball with the backside of the shirt facing up. Next, place a half-inch square of heat adhesive bonding fabric, like Wonder Under or Stitch Witchery, covered by the half-inch square of the patch fabric. Using a hand iron, touch the iron to the patch until the bonding adhesive holds.
Remove the balled-up fabric and turn over the hoop. After that, use the point of the iron and push the edges of the hole together until they close. Sometimes, Smith says, she heats up her curved scissors and uses them to pull the edges together. To finish up, cut off any excess fabric from around the sealed hole and cut a new piece of backing. Embroider the design over the backing, and it should look like new.
The problem: Unstructured six-panel hats
The cause: Six-paneled caps provide less stability due to their softer, more relaxed construction and minimal internal support. They also have a limited design area and thicker seams that can obstruct the needle’s movement. The stretchy fabrics many are constructed with can pull and distort while being sewn.
The solution: “I recommend using a really stiff backing, one that is almost like cardstock,” Smith says. “I always had a big cardboard box sitting by my machine. I used the box to spray the backing with spray adhesive. Before hooping, I would lay the hat down and mold the backing to the cap so there were no wrinkles.”
Ideally, Smith says, you should use a cap frame designed for the rounded shape. “Be sure and make it’s taut within the hoop,” she says.
The problem: Loose stitches
The cause: No lock stitch, which allows the thread to pull out and look like a thread break.
The solution: “When digitizing, a lock stitch must be inserted at the beginning of each segment or letter,” says Joyce Jagger, principal of The Embroidery Coach, based in Birmingham, New York (theembroiderycoach.com). “This is sometimes skipped because the digitizer assumes there will be embroidering on top of that area.” Doing so, however, can result in problems. Don’t make this same mistake with your own embroidery.
The problem: “Poor digitizing” by outside contractors
The cause: Lack of communication and/or not being willing to pay for quality work.
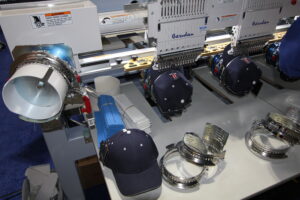
Hats pose a number of challenges. Careful hooping and the use of the right backing is critical to overcoming them. Photo courtesy of Impressions Expo
The solution: “A poorly digitized design happens when you do not provide the digitizer with all the information needed to properly create the file,” Jagger says. For example, when you do not provide how much underlay or the pull compensation that is needed, this can result in misalignment or puckering.
“Another reason,” Jagger says, “may be the price. You get what you pay for. If you are paying $15 to have a design digitized, do not expect to get the same attention to detail and smooth sew ability as if you paid $100. Digitizers are charging for their time. They will spend as much time as they are getting paid.”
When choosing a digitizer, rule No. 1 is they must digitize using the same software as you do. In addition, Jagger says, “There is certain information you need to provide the digitizer to achieve the best results. Clearly state the type and weight of the fabric and style of the garment or item. If you will be sewing it on more than one garment, provide the information for each piece. You can’t use the same digitized design on every type of fabric.”
Along these same lines, Jagger emphasizes you need to clearly state the size you need the design to be. If you need it in more than one size, let them know. “Be sure to also tell your digitizer how much underlay and pull compensation is needed,” Jagger says.
The problem: Needle breaks
The cause: The life of a needle is dependent on a variety of factors, including length of time used, fabric type, stitches per minute, the type of stabilizer and if spray adhesive is being used. Breaks can also be caused by mechanical issues, like the needle striking the edge of the hoop.
The solution: “When your needle is breaking due to wear and tear, the simple solution is to replace it,” says Deborah Jones, Consumable Products Manager for Dallas, Texas, based DIME EMB LLC (shop.dzgns.com).
“A good rule of thumb is to replace a needle after three thread breaks in quick succession,” she says, noting others suggest replacing a needle after five to eight hours of continuous use. “You can’t effectively know how many stitches you’ve sewn with a needle on a multi-needle machine. You’re never going to be able to keep track of it. [However,] using this guideline is a cheap way to avoid damage to the fabric and more thread breaks,” Jones says.
The problem: Sawtooth edges, puckering, loose stitches
The cause: The wrong size or type of needle for the fabric in question.
The solution: “I recommend always using the smallest needle practical for the fabric,” Jones says. “A smaller needle is ideal for lightweight fabrics and lightweight threads, because the groove in the needle is what guides the thread to the eye. If you’ve got a thin thread in a wide groove, there’s too much movement of the thread as it is traveling through the groove to the eye. This prevents the stitches from sewing with a clean edge. Sawtooth edges on satin stitches are often caused by using a needle that is too large.”
The point of the needle also is another important consideration,” says Jones. “The general rule is to use a sharp on wovens and a ballpoint on knits. On wovens, you want to pierce the fabric, but on knits you want the ballpoint to spread the fibers of the fabric rather than piercing it.”
Jones adds: “The light ballpoint is the needle most used, but there is an extra slim ballpoint (ESB) that is designed for sewing on 100 percent polyester performance wear. This type of fabric is knit with a finer yarn, which needs a finer point needle.”
The problem: Fabric fraying, holes and runs
The cause: A blunt or damaged needle.
The HoopMaster Mighty Hoop helps avoid hoop burn by employing a series of magnets to hold a garment in place. Photo courtesy of HoopMaster
The solution: The best way to prevent damage to fabric is to regularly replace your needles—before problems occur. A higher-quality needle can also prevent damage.
Chrome-plated needles are the least expensive but have to be changed the most often. Titanium-coated needles, which have a thin titanium coating that makes them slicker and causes less friction, are more expensive, but can last up to five times longer.
Another option is ceramic-coated needles, which offer the same benefits without requiring an expensive natural resource. Both types are stronger and run cooler than chrome, resulting in less needle and thread breaks.
Because they are less likely to bend or distort, the tips on these kinds of needles maintain their shape longer, cause less damage and have higher stitch quality. Higher-quality coated needles can be especially useful when stitching through any kind of spray adhesive because the adhesive will not stick to the needle in the same way it can with chrome.
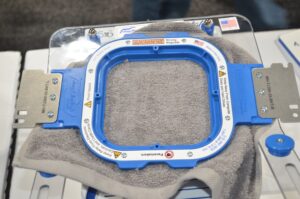
The problem: Hoop burn
The cause: “There are multiple reasons [for hoop burn], but one of the biggest is having the outer ring of a standard hoop adjusted too tightly,” says Jesse Mack, president of Midwest Products, based in Germantown, Wisconsin.
The solution: “Once you have hooped a garment, do not tighten the hoop afterward, as it is quite easy to over tighten the lower ring and damage the fibers of the fabric,” Mack says.
Hoop burn can also occur when the item is sewing in the machine, Mack says. Sometimes the brackets on the hoop, or the hoop itself, might be adjusted incorrectly. The hoop can also be warped. This puts too much downward pressure on the bobbin arm. When there is too much downward pressure, especially if a machine is running fast, say, 1,000 stitches a minute, the garment will rub on the bobbin arm harder than it should, which can in turn cause hoop burn.
“When putting a hoop in the machine,” Mack says. “It should be resting on the needle plate. You do not want a lot of downward pressure on the needle plate, and you don’t want it to be above the needle plate. If it is not correct, try to bend the hoop or the brackets on the hoop so that it sits on the needle plate correctly.”
In addition, Mack says, if your machine has a support table and the garment you are embroidering allows its use, this can spread out the pressure between the hoop and the machine, further reducing the chance of hoop burn.
“Some fabrics are delicate, making it hard to completely eliminate hoop burn,” Mack says. In situations like these, he says, it is best to use either a magnetic hoop, a clamping system or sticky backing.
According to Mack, magnetic hoops, like the HoopMaster Mighty Hoop (hoopmaster.com), do not pinch the fabric like a standard hoop, which causes less distress to the fabric. They instead consist of a magnetic top and bottom hoop that securely holds fabric in place without the need for tightening or adjusting. This makes them ideal for delicate or stretchy fabrics prone to hoop burn, while at the same time being versatile enough to work with thick workwear, like a canvas jacket.
Clamping systems, on the other hand, incorporate a spring-loaded frame that, in addition to holding the fabric in place, provides consistent and even tension throughout the embroidery process, making them ideal for many hard-to-hold items and fabrics. The third alternative, sticky adhesive backing frames, are good for delicate or difficult material, as they do not need to pinch the fabric between two frames.
“Sometimes hoop burn is unavoidable, but there are things you can do to fix it,” Mack says. “The simplest would be to use a stiff brush. Sometimes, you can brush it out. If that doesn’t work, lightly spray [the garment] with water and let it dry. You could also spray it with water and then use an iron to flatten it out. Adding some fabric softener to the spray bottle may further increase its efficiency. Sometimes just heat pressing the item may remove the hoop burn.”
Deborah Sexton is a former editor of Impressions Magazine and now owns her own company, Saracen Communications, doing digital media marketing, copywriting and public relations work for companies in the decorated apparel industry. You can reach her at [email protected].


