Figure 2.
Direct-to-film (DTF) transfers represent a fast-growing garment-decoration method that’s ideal for designing layouts for sports apparel. From team and practice uniforms to fanwear, DTF transfers allow you to easily and inexpensively incorporate full color into layouts.
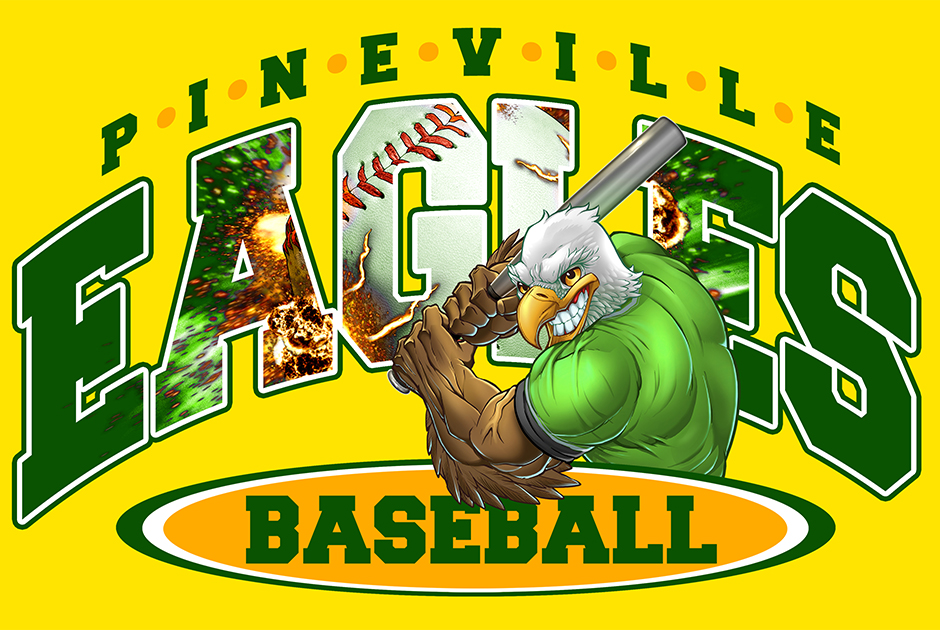
Follow along to see how to create the designs shown in Figures 1 and 2 in Adobe Photoshop, and learn what to consider when creating DTF layouts. Then, you can apply the same techniques to your own designs not only for DTF, but any production method.
DTF is a digital printing method that allows the use of unlimited colors in designs. As you can see in Figures 3 and 4, two full-color images were used when creating the designs. For both, the blue color was changed to green by using the Hue/Saturation Adjustment tool, which can be found in Image Menu > Adjustments > Hue/Saturation.

Figure 3.
Because both images contain multiple colors, the “Master” option was used, and “Blues” was chosen from the drop-down menu (see Figure 5). The hue slider was then adjusted until the desired color was achieved. The Saturation and Lightness sliders also can be adjusted to make the specific color brighter, lighter or darker.
DTF: Avoid Heavy-Handed Transfers
DTF transfers naturally have a softer feel on shirts than other production methods. However, the more ink, vinyl or other product that is applied to a garment, the heavier the feel. For this reason, creating graphics that incorporate openings throughout the design will help alleviate this problem. This tip can be beneficial to most production methods.

Figure 4.
When a single solid image is printed at full size, it can create a stiff, heavy, “bulletproof” feel on the garment. By creating a layout with openings, it allows the shirt to show through and provide breathability, making it more comfortable to wear. For this reason, instead of creating a layout with the eagle as a central image (see Figure 6), a text layout was created for the front and the eagle was added as a supporting graphic.
On the back, the eagle was pasted inside the numbers and another supporting graphic of the exploding baseball was added, as well as a single-color, large-
halftone-dot image.
On the front, the word “Eagles” was typed and then arched using the Text Warp option (see Figure 7). The exploding baseball image was

Figure 5.
copied and pasted into the new layout document by clicking on the art layer in the original document and dragging it to the window of the new document and placing it above the text layer.
To paste it inside the text, hover the cursor between the image and text layers, and click the Option key (Alt key on a PC). The image automatically will be placed inside the text and can be moved, scaled or adjusted until it’s arranged to your liking. The text color was set to a dark green, and Layer Styles were used to add a white and green gradient stroke to the outside of the letters.
The Elliptical Marquee tool was used the create the ovals at the

Figure 6.
bottom, and then more text was added in the oval and at the top. The eagle was copied from its original document and pasted in the new document between the oval and Eagles text layers.
Once the eagle’s size and position were adjusted and finalized, the layer was duplicated and one copy was moved to the top of the layer panel list so that the arm fell in front of the oval. Using the Lasso tool, the eagle’s waist was selected and deleted so that it looks like his body goes behind the oval.
Short Production Runs with DTF Transfers
Another big advantage of DTF is the ability to do short runs. You can create custom, personalized designs, which is ideal for team sports because you can create a layout with a player’s name and number, then change it out for another player with no additional production costs.

Figure 7.
For this layout, the player’s name and number were typeset and adjusted to the desired sizes. The name was colored with green and stroked with white using layer styles. By keeping the name in text mode, you can come back and change it to another player’s name.
For the number, a gradient stroke of orange, green and white was added and set to the outside. In order to make the inside of the numbers transparent, the “Fill” in the layers panel was set to 0% (see Figure 8).
For this layout, a different technique was used to paste the eagle inside the number. Hold down the Command key (Ctrl key on a PC)

Figure 8.
and click on the T icon of the number layer to select the outline of the number. Go to the eagle art file and copy the eagle.
Go back to the layout document and under the Edit menu, go to Select Special > Paste Into. This will create a mask of the number and paste the image inside the mask. If the previous method from the front layout was used, when the eagle is pasted inside it would not be visible because the fill was changed to 0 to make the numbers transparent.
To adjust the eagle, click the image thumbnail of the eagle in the Layers panel, and resize and move as needed until he’s positioned to your liking.
Halftoning and DTF Transfers
In keeping with the need to create a lighter feel, incorporating a large-halftone-dot pattern into your images like this back layout will not only create a unique look, but it

Figure 9.
also will provide a lighter hand. To create this effect, open the full-color image and change the mode from RGB to Grayscale. This is done in Image Menu > Mode > Grayscale. When it asks if you want to discard color information, click Discard.
Next, change the mode again to Bitmap and click OK when asked if you want to flatten the layers. In the Bitmap window, set the Resolution Output to 300 pixels/inch, and the Method to Halftone Screen (see Figure 9). In the Halftone Screen window, enter your frequency, angle and shape. For this image, the frequency was 15

Figure 10.
lines per inch, the angle was 45 degrees and the shape was round (see Figure 10). The smaller the frequency number, the larger the halftone dot will be. However, the larger the dot, the less detail you will maintain in the image, possibly making it unrecognizable.
Once the halftone screen is set, change the mode back to grayscale (see Figure 11). In the Grayscale window, set the Size Ratio to 1 and hit OK. Go to the Channels panel (Window Menu > Channels), hold down the Command key (Ctrl key on a PC) and click the thumbnail image of the Gray Channel. This will create a selection of the image. You should see the “marching ants” surrounding the image, denoting that it’s selected.

Figure 11.
Invert the selection (Select Menu > Inverse), go back to the Layers panel and create a new layer. Make sure the foreground color is set to the color that you want your halftone to be. You can go back to your working file and use the Eyedropper tool to sample the color if needed. Hold down the Option key (Alt key on a PC) and hit the Delete key (Backspace on a PC). The selection will automatically be filled with the color on a transparent layer.
Select all, copy the halftone screen and go back to your working document. Select the number 30 and paste the halftoned image into the selection like you did previously for the eagle. Make sure the layer is under the eagle layer. Move the image around within the text until it’s positioned the way you like.
DTF Transfer Sizing
Another great thing about DTF is the ability to print small stem sizes or line thicknesses — as thin as .018 inches. This makes printing small, free-floating text possible, as well as the large halftone screens like we have here.

Figure 12.
However, because the image has faded edges and the colors in the design fluctuate, the dots will become gradually smaller in areas. It’s good to create a small dot at .018 inches to use as a gauge and make sure everything is appropriately sized (see Figure 12).
For the screened image, move the dot around and any dots that may be too small can be erased. Keep in mind that when you create your screened image, ensure it is done to size. If you make it too large, and need to reduce it, the dots will become smaller, possibly making the image unusable and forcing you to redo the halftone screen.
DTF technology has a lot of potential and is trending toward becoming a major decoration application for sports uniforms and other market niches. These tips will help you get started with this process, as well as providing useful ideas for other processes.
Dane Clement is president of Great Dane Graphics, as well as vice president of creative for GroupeSTAHL. He has been speaking and writing for the decorated-apparel industry since 1987. He has authored several artwork-training books for various garment-decoration methods. For more information about the DTF process check out The Nuts & Bolts of DTF.
Updated March 30, 2025


