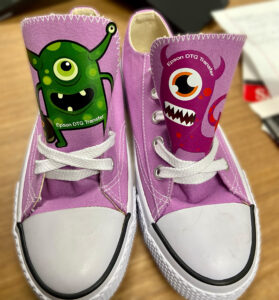
Over the past few years, blank-apparel decorators and print-shop providers in general have seen an increase in smaller, customized orders and have had to adjust their workflows accordingly. However, what many garment decorators may not realize is that they most likely already have the ability to print directly on either a garment or a film transfer sheet with a current direct-to-garment (DTG) printer, thereby increasing their potential output offerings and overall shop efficiency.

With DTF, the sky’s the limit in terms of the kinds of apparel you can decorate. Photo courtesy of Epson
Direct-to-film (DTF or DTFilm) printing and the use of film-transfer sheets allows garment decorators to print and transfer an image onto fabric blends that are not typically supported by DTG printing, such as 100-percent polyester, nylon and other quick-drying, athletic fabrics. With DTF printing, print shop providers can transfer printed images to a variety of other items, such as shoes, hats and handbags. Additionally, it allows print shop providers to expand their product offerings to include accessories and home decor.
Once a film-transfer sheet is printed, it can be applied to a garment within minutes or stored for later use. With this technique, garment decorators and print shop providers can print multiple images at once to adhere later, as well as print multiple custom images on a single film-transfer sheet to reduce waste. For example, if printing a logo, the print shop provider can print multiple logo images per film sheet to apply later to hats, shirts, tote bags, golf towels, etc.
Tools for Apparel-Decorating Success
Again, print shops using a DTG printer most likely already have the ability to print directly onto film transfer sheets. For the best results when printing film-transfer sheets, the following are recommended:
Raster Image Processor (RIP) software:
RIP software sends instructions directly to the printer for faster processing time. Decorators can choose to use a specific RIP software program or, if applicable, they can go with the software program that is equipped with the printer.
Film Transfer Sheets:
Film transfer sheets are available either as pre-cut sheets in a variety of sizes or as rolls. The latter typically make sense for larger, industrial-size orders. For most DTG printers, cut sheets will be ideal.
Thermoplastic Polyurethane (TPU) Powder:
After bonding with the digitally printed ink, or inks in a design or logo, TPU creates a permanent bond between the design and whatever kind of garment is being decorated during the heat-pressing process. When using TPU powder, it is recommended you employ a variety that meets the internationally recognized health standards set by the product-testing firm OEKO-TEX (oeko-tex.com) and employ all necessary safety precautions, including wearing a face mask, since the powder can easily travel through the air when applying.
Heat-Press Parchment Paper:
Similar to the parchment paper used for baking, heat-pressing parchment paper provides a great non-stick protective barrier between the print and the hot surface of a heat press.
Quality Decorating Heat Press:
A heat press is used to bond the printed inks to the TPU powder creating a custom film-transfer print. A heat press is also used to adhere the finished transfer to whatever is being decorated. Don’t skimp on this piece of equipment! Be sure and use a quality piece of equipment from a reputable manufacturer.
Working with Film-Transfer Sheets
Printing on a film-transfer sheet is easy and can be done by pretty much any print shop provider already in possession of a compatible DTG printer. Similar to traditional DTG printing, upon completion of the design phase, the custom image is processed using either a standalone RIP software or the garment-creator software included with the printer.

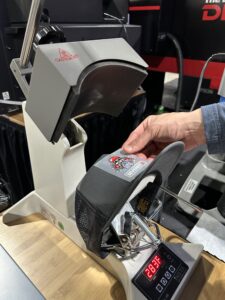
Heat pressing a DTF design created by a DTG printer to create a custom-decorated cap. Photo courtesy of Epson
As you are doing so, be aware that a significant difference at this point will be the fact that the layering of the print will be the reverse of what is used for DTG. Specifically, when creating a film transfer, the CMYK layer is printed first, after which the white ink base layer is put down. The reason for this is when it comes time to do the actual decorating, the transfer will be placed face down on whatever is being decorated, i.e. to “top” layer on the transfer will be the bottom one on the fabric, in contrast to a DTG print, in which the lower layers are printed first. Most RIP software includes the ability to control print layering.
Film transfer sheets are single-sided, with the printable side having a matte, textured finish. The matte, textured-finish sheet side faces up on the platen during actual printing. When printing is complete, carefully remove the film-transfer sheet from the platen and take it to a location as far away as is practical from the printer to apply the TPU powder. As mentioned earlier, TPU powder easily travels in the air and can potentially damage nearby machinery, as well as cause health concerns if inhaled. Again, wearing a mask is highly recommended, especially when applying the powder by hand.

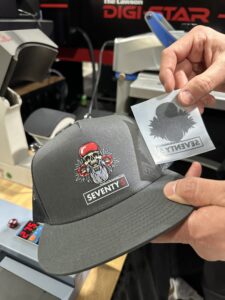
Removing the transfer film from a DTF image after heat pressing onto a cap. Photo courtesy of Epson
Once the TPU powder has been applied to the print, carefully shake off any and all excess powder. The resulting image should have an appearance of a powdered donut. Next, use a heat press to cure the inks to the TPU powder. Times will vary based on the temperature and location of the platen on the heat press. Once complete, the transfer should be left to cool for a few minutes after which it can be immediately applied to a garment or stored for later use. Film transfers can be stored in a cool, dry location for months if needed.
If applying immediately, first heat the garment to remove any moisture. This is done by placing the garment, without the custom print, on the heat press platen with a piece of parchment paper on top and pressing for 10 to 15 seconds. Once the garment is heated, remove the parchment paper and place the film transfer in place on the garment. Place parchment paper on top of the transfer and press for the recommended time and pressure for the fabric being used.
When complete, remove the parchment paper and promptly remove transfer if using hot-peel film. If using a cold-peel, allow the garment to cool until it reaches room temperature before removing. Typical cool-down is 30 to 60 seconds.
Once the film is removed, the garment is finished and the printed image should have a smooth finish, feeling much like a sticker. To minimize the sticker feeling and maximize salability, reload the garment onto the heat press with parchment paper on top and press for an additional five seconds. The added heat will allow the transferred image to adapt to the fabric texture.
Using a DTG Printer for DTF
Decorators using a DTG printer for DTF as well can increase revenue and product offerings by leveraging the respective strengths of both direct-to-garment printing and film-transfer. These include the ability to offer customers a wider range of products and fabric applications. Again, film transfers allow a decorator to expand its product offerings to polyester, cotton/poly blends, tri-blends and more—even products outside the textile space.
DTG-based prints, whether printed directly onto a garment or onto a transfer sheet, can last the life of the fabric to which they are being applied. Both printing options offer vibrant custom designs, and each have their own set of benefits. Print shop providers will find that customers appreciate having the ability to print their custom design on a variety of garment types, regardless of fabric, as well as other custom gifts. Being able to choose the appropriate method, print shop providers expand customization options for customers, increasing customer retention, turnaround time, and revenue opportunities.
Tim Check is a senior product manager at Epson America with over two decades of product development and product marketing experience in the printing and digital-imaging industry. Working in the Professional Imaging division at Epson America, Tim is responsible for the company’s digital textile, dye-sublimation and direct-to-garment printing lines.


