“But I’m not an artist!” the screen printer said on the phone for the second time. He had agreed to do some work for his best customer, with a last-minute request for artwork help. He called a local contract artist who occasionally did work for him, but she couldn’t help this time.
If you’re a “non-artist” like the screen printer in this scenario, the good news is that a significant portion of art requests are “production art” tasks, not “creative art” tasks.
Why does this matter?
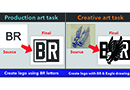
First, it’s useful to review the difference between production art and creative art (see Figure 1). Consider the skill set and specific techniques needed to complete each type of artwork. With production artwork, the tasks tend to be more about craft and execution to create a printable image. Image/logo re-creation, duplication and minor design modifications typically are production tasks. Other art processes that fall into the production art category include color separation, film output and creating art approvals.

Creative art tasks tend to require other skills like illustration, logo/graphic redevelopment and detailed concept creation in stages (rough, comp, outline and final render). Additional creative tasks may include helping clients who have no idea what they want and creative typography and stock-art manipulation.
Now that the differences between production and creative art are better defined, you need the confidence to attempt any art task. The talent and practice of artwork is so closely linked that one doesn’t exist without the other. People who display “natural talent” at art almost always practice on a regular basis.
Becoming competent at production artwork or even creative art is more about consistent practice, skill development, learning to “see,” and competency with design fundamentals than any talent that may or may not be a genetic predisposition. However, there’s always a learning curve for any task that requires skills and proficiency.
Production-Art Hacking
The trick to becoming competent rapidly at production artwork is to approach it with a hacking, yet serious mindset. Focus on 20% of the skills and techniques you’ll need for 80% of production tasks that you’ll likely encounter. Some artists will frown on skirting little-used tools or techniques, but this type of accelerated learning is only possible if you focus on the mandatory skills rather than trying to learn everything.
First, sort the artwork that typically comes into your shop. If you track all art tasks performed in a 30-day window, you should be able to categorize and sort tasks into several buckets (see Figure 2).
1. Creative Tasks: These are orders with little or no direction or sources for reference, or they’re original, custom design requests. Allocate these tasks to be outsourced to other artists so you don’t get frustrated and waste a lot of time.
2. Simple Logo and Graphic Recreations: These art tasks include the “Can-you-copy-this-off-of-my-business-card?” variety.
3. Existing Art with Modifications: These tasks come from companies with a new address or slogan that want a slight alteration to their previous work.
4. Quick Text Mockups or Clipart Graphics: If you have a graphic catalog of premade designs or previous designs that were created as templates, this job type is a perfect fit.
Modify your production-art categories to match what’s common in your shop, with the goal of training so that you can handle each category’s tasks the majority of the time.
Production-Art Training
The following is a short list of training items that will make most screen printers and shop owners feel more comfortable with production art tasks:
1. Drawing: You don’t have to be Picasso to trace a logo by hand, then scan it into your graphics software and quickly create a vector that you can edit and separate for printing. So many assertive non-artists spend hours in their graphic-design software slowly creating piece after piece of a complex logo because they don’t try to draw it.
Start simple. You also can “cheat” by using tracing paper, a light table and your phone to create guides (see Figure 3). Make your source material as good as possible prior to trying to draw it.
2. Bitmap-to-Vector Tracing Programs: Your graphic-design software should include another piece of software that will allow you to trace an image and convert it into a vector graphic (Powertrace in CorelDRAW). Getting to know this software is essential for saving time (see Figure 4).
However, you also should know when it’s better to avoid the software and just draw the design. If you’re increasing the size of a small logo from a tiny business card to a full-front print, you’ll likely have to re-create or draw it, then Powertrace it.
3. Font Creation, Matching and Modifications: Since there are millions of fonts and it’s hard to quickly find, match and modify them, you should know which fonts you have, as well as some of the font terms and basics. Consider taking font-tutorial classes and quizzes. Once you know the parts of typography, and how different styles look and are categorized, it’ll be easier to know where to start looking for weird fonts that you’re sure to see on customer-provided designs.
There are a host of free websites that provide fonts you can download, but learning the basic principles of font usage and qualities will make all font tasks go more quickly. Learn a couple of websites — such as whatthefont.com — to help you match fonts. Print a basic group set of fonts in each category to show customers. Customers often will rapidly pick a font from an example sheet, but they may take forever looking at the choices on a screen.
4. Graphic Template Sources and Clipart: You may have a “love-hate” relationship with clipart sources, but all of these types of tools have their place. The right piece of clipart for a rush job literally can save you hours or days of time. As with all art tools, there is good usage of templates and clipart, and then there is overuse and poor design choices.
Learning some basic design fundamentals so you can know which art style works best with a particular typography style can help enormously (see Figure 5). To use graphic resources like templates and clipart, you’ll need at least a working knowledge of your design software and a handful of tutorials to review. Be practical, learn as you complete jobs and keep improving.
5. Find a Mentor or Pay for Training: Once you have a foundation using production-art tools, find an artist you respect and either bring that person to your shop or try to shadow the artist for a week. Even though this can be a more expensive option, it’s often the most valuable because of how fast you can learn exactly what you need to know. You also can look for someone to work with you in a virtual or group program. The main thing is to pick someone to train you in the specific tasks you need to know for your shop.
Becoming comfortable with production artwork if you don’t consider yourself an artist isn’t impossible. Once you shake off any preconceived notions of what it really takes and break down each specific task you need for your shop on a daily basis, you can formulate an action plan. Add to this a couple of hacks to make the whole process easier and you may be surprised at how quickly you’re accused of being an artist after all.
Thomas Trimingham has been helping screen printers for more than 25 years as an industry consultant, artist and high-end separator, and author of over 180 articles. He is currently the director of marketing for M&R Printing Equipment. For more information or to comment on this article, email Thomas at [email protected].


