In Part 1 of this series, step-by-step techniques were listed for press setup, pallet adjustment, leveling screens, setting off-contact, preparing pallets and applying pallet adhesive.
For Part 2, let’s start with emulsion and sufficient coverage on screens. This is important not only because it’ll keep the ink from coming through in areas where you don’t want it, but it also has a major influence on the printed image’s quality. It can make your print’s edges look jagged or smooth, or make the print look less or more opaque.
Emulsion coverage often is overlooked and underappreciated. With the correct amount of emulsion, you’ll work less and make more profits. Some shops work hard at trying to save money by using less emulsion when doing so will cause you to lose money and productivity.
Run your hand over an exposed screen (on the bottom, or shirt side). If you can’t easily feel where the emulsion begins and ends, you may not have enough coverage. Also, be sure to allow enough time in the exposure unit. If not exposed correctly, emulsion can break down prematurely, causing pinholes and unnecessary downtime.

Every emulsion-coating technique will result in varying exposure times. There’s no “one-and-done” way of performing the process. Insufficient opacity and underexposed screens will yield unsatisfactory printing results. As with inks, so it is with emulsion. Pinholes, premature breakdown, poor edge definition, ugly halftone details, etc., are all avoidable by creating enough emulsion coverage.
Frames & Screens
There are three basic types of frames: aluminum, wood and retensionable. I prefer aluminum frames, as they don’t warp over time and keep their shape well. Retensionable frames can be tensioned as needed so that the mesh always will be tight. This allows the mesh to become work-hardened and resistant to loosening during production.
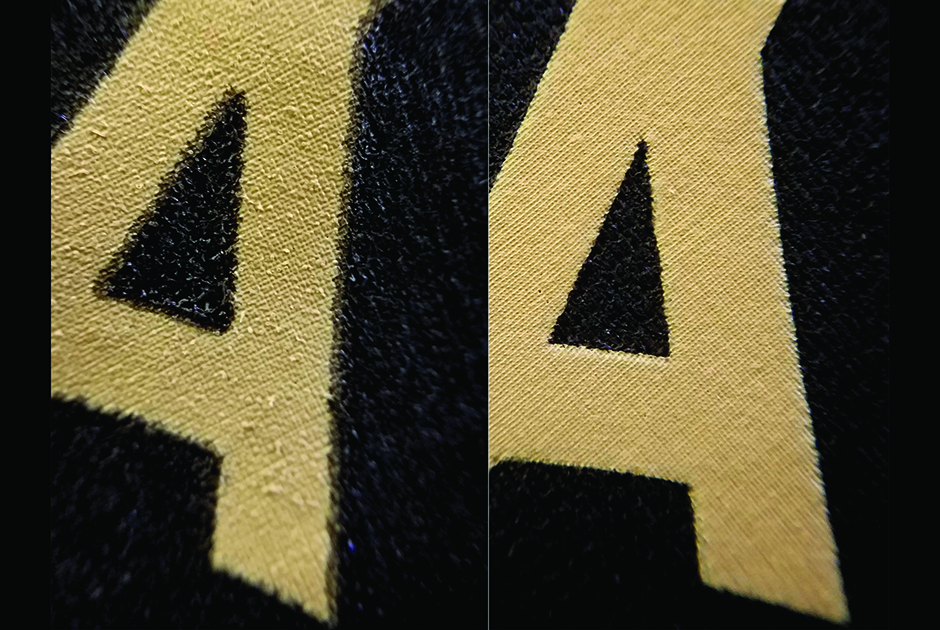
The tighter the mesh, the better the prints will be. Loose mesh can result in blurry or out-of-registration prints. If you’re printing a design with multiple screens and encounter registration issues or blurry edges, check the tension on each screen. One or more of them likely is loose and causing the issue. Imagine printing through mesh made of rubber bands. The tighter the mesh, the thinner the rubber bands, which will allow more ink to flow with less effort.
Choosing the correct mesh size depends on what you’re printing. If you mainly print athletic numbers, low-detail prints or use special-effects inks, stick to lower mesh counts. Finer details or halftones need higher mesh counts.
Here’s a quick overview of the best mesh sizes for certain ink and printing types:
1. 25, 40: These mesh counts are predominantly used for glitter inks. The large openings allow the metallic glitter flakes to pass through.
2. 60, 86: This mesh range is used for printing specialty inks, such as puff or high-density; fine shimmers; glitters; or metallics. Again, the larger mesh opening allows for a heavier ink deposit and smaller metallic shimmer flakes to pass through.
3. 110, 155: These meshes are ideal when a large ink deposit is needed, such as athletic numbers, printing white on black fabric, low-detail art or heavy white-ink prints. This will require additional emulsion and longer exposure time to get the desired results.
4. 160, 180, 200: This medium-sized mesh range is ideal for medium-detailed artwork. They are ideal for printing a white underbase. The 200-count mesh can be a happy medium screen selection for when a 230 mesh is too fine and a 155 mesh is too coarse.
5. 230, 280, 305: These higher mesh counts work well for lower ink deposits, halftone printing and simulated-process printing.
6. 355: This high mesh count allows only a very low amount of ink to pass through. It’s often used for printing 65-line or higher halftones for detailed prints and generally is used only by advanced printers.
Screen Printing Inks
When it comes to ink, choose a quality brand through a distributor that will assist you in making the best choice for your needs. Buying inks online may save money, but it only works well after you’ve tested them for compatibility, printability, durability and more. Do your homework and test them to be assured you’re getting what you paid for. Here are some basics to remember:
1. Get the right ink for the job. For example, get ink for cotton — such as a cotton white — if you’re printing on a cotton substrate.
2. Use a low-bleed ink if you’re printing on 50/50 poly/cotton fabric. Don’t use a low-bleed ink on dyed cotton fabrics, as ghosting may occur. Keep in mind that low-bleed inks are more expensive, so only use them on polyester and polyester blends.
3. Use ink that can accommodate the stretch of stretchy fabric. Stretch additives are available if you want to make standard inks stretchier.
4. Stir ink prior to use. This shearing effect will make the ink more printable and easier to use. It also will help ensure all the components are mixed well. This applies to virtually all plastisols.
5. Flood the screen with ink before actually printing. Flooding will ensure even distribution and pushes the ink into the screen. If the proper amount of flood pressure is used, then the ink will be in the correct position for the squeegee to apply the ink. If this isn’t done correctly, the squeegee must do the job of the flood and squeegee, which slows whole process and costs you money, time and quality.
Flashing and Screen Printing
Flashing ink has become a standard practice in the industry, especially when printing a white underbase on a dark substrate. However, many screen printers are unaware that they actually can overflash their inks.
The purpose of flashing is to simply get the ink to a “gel” state so that the next color printed on top doesn’t pick up the flashed color. It also may be used to help minimize the amount of wet ink accumulating at the back of the next screen. Most inks achieve a gelatinous state at 180˚F-200˚F. The ink film should just feel dry to the touch, not completely cured. Test the flash by slowly working up to the proper temperature.
As production progresses, keep an eye on the temperature as the platens heat up and the flash temperature or distance to the substrate may need to be adjusted. When the ink is overflashed, it can cause intercoat-adhesion problems with subsequent ink layers. The inks may become tacky, peel away from the overflashed ink or even partially wash off.
Flashing after every color is only necessary when using certain high-pigment water-based inks. Otherwise, it can overheat the various ink layers, also causing intercoat-adhesion issues.
Curing Screen Printing Inks
When it comes to plastisol ink, successful curing comes down to a few basic things:
1. Ink-Film Temperature: The entire ink film, from top to bottom, needs to reach about 320˚F. Some inks can fuse at lower temperatures (about 270˚F).
2. Ink-Film Thickness: If the ink film is thicker, it will take longer to reach the required temperature so you may need to slow down the dryer. Time is always on your side.
3. Dryer Temperature: If you scorch the garment when slowing the belt speed, then you also can lower the dryer temperature. Heat is a necessary evil but it can cause problems. For instance, in addition to scorching, too much heat can cause dye migration on polyester.
Screen Printing Squeegee Selection
The most commonly used squeegee hardness is the 70-durometer variety. Keep in mind that the durometer can regulate the amount of ink printed. The softer the durometer, the more ink gets put down. By increasing the amount of ink for a regular print, you may lose some of the print’s definition. Usually, softer-durometer squeegees are used for special-effects inks with a thick deposit, such as for a puff or gel ink.
If you would prefer less ink deposit, try a 75- or 80-durometer squeegee. Double- and triple-durometer squeegees also are available. The latter consists of a “sandwich” of a hard durometer in the center with softer blades on the outside. This type of combination squeegee can help because the harder middle blade keeps the softer outside blades straight so that they don’t fold under pressure.
Kieth Stevens is the Western regional sales manager for International Coatings. He has been screen printing for more than 42 years and teaching screen printing for more than 12 years; is a regular contributor to International Coatings’ blogs; and won SGIA’s 2014 Golden Image Award. For more information, visit iccink.com. You can also follow the company’s blog at internationalcoatingsblog.com. To read Part 1 of this two-part series, click here.
Updated 10/20/25


