There are plenty of challenges when it comes to machine embroidery, but thread doesn’t have to be one of them. Granted, the options available these days may seem endless, with countless brands, weights, types and colors to choose from. However, knowing which option is right for a particular project isn’t rocket science. That said, it also isn’t a situation in which one-size-fits-all. Different businesses will have different customers with different goals. Getting to know the various embroidery threads out there may even open doors you’d never considered knocking on to serve a new type of customer.
Before we explore the different types of threads available stitch by stitch, let’s take a minute to understand the labels you’ll find on most commercial threads. While there may be some variation, for the most part, you’ll find the brand of the thread along with its weight, color name and number, lot number, length of the cone and thread type. This information will help you achieve success by pairing the thread with the correct needle and making any necessary adjustments to your machine settings and/or the design you’re working on.
Be aware that not all brands of thread are created equal. Some will perform better than others. What works for one shop may not work for another due to differences in equipment and conditions. Ultimately, the most important thing is to select a reputable commercial-quality thread. My sanity is worth more than cents on the dollar, and yours should be too. Poor-quality thread can lead to downtime due to thread breaks, slow sew speed and lint build-up, which can result in tension troubles with your equipment and additional maintenance time. With thread being one of the least costly inputs for embroidery, I don’t feel it is an area to pinch pennies.
Before investing in a large inventory, consider trying out a variety of brands to see if one performs better than the others on your particular machine or has a better look and feel. Besides the obvious performance differences, some brands will also offer a greater variety of colors. Sheen and feel may vary as well. When dealing with government contracts or corporate customers, it is especially important thread color doesn’t vary lot to lot allowing you to produce repeat orders with confidence.

What to Look for in Machine Embroidery Thread
Once you’ve found a brand or two you are satisfied with, there are a few other factors to consider. Check, for example, to be sure that the brand is supported in your design software or can be added to your thread catalog, thereby allowing you to set your design colors to your actual threads. Being able to do so will make it that much easier to produce repeat orders without having to chase after a bunch of paperwork to see which colors to use.
You might also ask your vendor if their threads are re-dyed in the event the original color is off at the end of the production process. Some vendors will re-dye a lighter color that didn’t turn out quite right in order to create a darker color or black, thereby weakening the thread.
Last, but not least, consider the style of the cone the thread is wrapped on. A snap cone style is a must for me. Why? Because it allows my threads to be the one immaculately organized part of my life! There are various styles used by different brands, which may add to the cost of the thread. But again, my sanity is worth it.
Another factor to consider is the size of the cone. Think about how you are going to store your thread, the budget you have to get started and the ease of threading cones onto your machine. Shorter cones may fit better in drawers, but tall skinny ones will take up less of a footprint on a shelf. You may even decide to put them on a series of hooks, in which case height doesn’t matter.
The most economical way to purchase thread is in 5,500-yard cones. However, when starting out, 1,100-yard spools can be the best way to build up an inventory of colors without having to invest quite as much right out of the gate. As they run out, your initial stock of threads can be replaced with larger cones. I also purchase smaller spools when a customer requests a special color that isn’t likely to be in more general demand.
One last factor to consider is where your threads are sourced, which can affect availability and shipping times. Be sure the vendor has consistent stock to avoid production delays. Once you’ve found a thread that performs well, looks great, lasts a long time on the garment and is supported by your software, you’ve found the perfect match!
Different Embroidery Thread Thicknesses
Now we’re ready to dive into thread weight, which can be thought of as the thickness. This is represented by a numerical value: the larger the number, the thinner the thread; the smaller the number, the thicker the thread. Unless you’re like me and like to live life on the edge, you’ve probably stuck pretty close to 40 wt. (weight) polyester thread. However, there is no reason to be scared of other weights, as long as you understand them. When using a different weight thread, for example, you may need to make adjustments to digitizing properties, such as density, tie in and trim types, as well as machine settings, such as speed and tension, and the thread path. Look at the machine’s manufacturer or distributor recommendations to be sure you are making the proper adjustments.
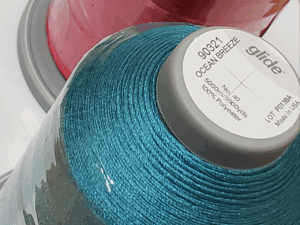
An example of the information found on the label of every spool of machine embroidery thread. Photo by Katie Wubben
There are a few great reasons to step outside of the box and use different thread weights. Among these is adding visual appeal and depth to your design by mixing a variety of thread weights. Consider using a thicker 12 wt. thread, for example, for a very full, hand-embroidered look while sewing the design in half the time thanks to its bulkier coverage allowing the density to be adjusted for fewer stitches. Heavier weight thread is also a great option for naturally fuzzy things, like a logo for a dog groomer, or sheep and wool festival.
Similarly, you may want to consider using a thin 60 wt. thread for tiny text and other small details. Whatever the case, before grabbing a different thread weight, be sure to consider how it will marry with the fabric it’s going to live on. Garments with a lot of texture may not be the best fit for super thin threads, while thicker threads may look and feel bulky on thinner garments.
Also be sure and consider where the garment will spend its life once it has left your shop. There are many types of threads available and each of them has its place depending on the project. Due to its strength and ease-of-use, polyester thread is the most commonly used type for machine embroidery. However, there are great uses for rayon, silk, matte and cotton threads as well.
Decorating a seat cover for a boat with a monogram, for example, may be a great fit for a matte thread that holds up well to UV rays. Similarly, metallic threads add a beautiful look to designs, but should be avoided on an electrician’s uniform. Polyester threads are likely to melt when exposed to heat, and therefore would not be great to use on a chef’s apron or fireman’s gear. However, polyester threads are great for sewing on towels, which may be exposed to harsh chemicals when laundered.
Pros and Cons of Different Thread Types
Before pitching a unique thread option to a customer, consider the item being decorated and the environment it is going to be exposed to. Asking these questions will help determine which thread is appropriate for each project. Garments being worn against the skin, for example, may work best with the softer feel of rayon or cotton thread, especially if the recipient is young and has sensitive skin. Some people are allergic to materials such as polyester, in which case a cotton thread may be the perfect fit.
Of course, while specialty threads are a great way to stand out from the crowd and upsell your work, they can also be intimidating. If you’ve gotten adventurous and set out on the self-taught path with little understanding of specialty threads, you may now have a pretty metallic shelf ornament due to the trauma you experienced!
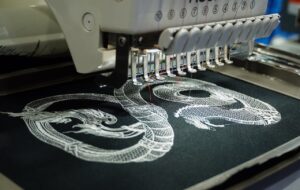
Finer thread is often the best way to go when creating details like the ones found in this design. Image by surasak – stock.adobe.com
My advice is to learn how to use this type of thread ahead of time, making some samples to show off to your customers. Metallics, thick fuzzy threads and even glow-in-the-dark designs are the kind of thing that will keep your customers coming back for more. Even if you don’t use them all the time, being familiar with how to use metallics and other exotic threads will allow you to say, yes, when the opportunity arises without having to use the customer as a kind of guinea pig.
While you’re at it, try boosting the visual appeal of any otherwise ordinary design by mixing in some specialty threads with the everyday threads you’re already planning on working with. In many cases, a specialty thread is most stunning when it accents an otherwise everyday bit of work. Mixing a variegated thread into, say, a campground logo is great when used in the fire portion of the design, but can look overdone if used on the text. A metallic thread can also add a beautiful eye-catching shine as a simple shadow element on a letter.
When taking this option, consider what changes will need to be made to sew the specialty thread(s) and how they will affect your production time. Some machines have features that allow these kinds of threads to be used more efficiently than others. If the tension is going to need to be adjusted or a different needle size is required, consider dedicating one thread path to that particular type of thread to keep it more production friendly, especially in a situation where customers request it often.
Even if your customers aren’t snatching the opportunity to make their designs stand out with specialty threads, you may find a showstopper sample helps sell more of your everyday work than basic samples. When someone sees something unusual, they remember it. They may even spread the word among their friends about that “cool thing” they saw on your social media post or on display in your shop. Potential customers will also have confidence in your ability to produce quality embroidered garments using a more everyday approach when you have proven you can handle the unusual stuff too.
Some Machine Embroidery Troubleshooting Tips
Now that we’ve explored the details of commercial embroidery threads, let’s take a minute to go over some troubleshooting tips. Thread breaks, poor coverage and false thread breaks not only eat away at your soul, they suck the fun and profit out of whatever job you’re working on. Thread breaks can be caused by a number of different factors making fixing the problem a challenge. In the event you’re using a quality thread, the first thing to look at is needle size, type and orientation, to be sure the needle isn’t playing a role. Even the slightest error in the needle orientation can cause the thread to start to fray, while your machine continues working away on as though nothing has gone wrong. You might hear a little twang, but the machine will just keep on sewing until it finally breaks the last strand.
When an inkjet printer has a clogged head, the print doesn’t look great. When a thread is missing a strand, it too struggles to provide proper coverage. We must therefore pair the thread with the right size needle and the garment with the proper type of needle, while also making the right choices with digitizing and machine settings to avoid thread breaks. Other factors can cause thread breaks too; however, evaluating this part of the process is a great place to start.
Another practice that can help eliminate thread problems is storing your threads in a cool, dry, dust free environment away from direct sunlight and moisture. Having threads live on a shelf directly above a heat vent or in line with a window is asking for trouble. Drawers are a great way to keep your thread free of dust, which can cause tension troubles as it and the inevitable lint clog up the tension knobs and thread path. If you’re not sure if a cone of thread is in good condition, take 12 to 18 inches off and pull it between your hands like a game of tug of war. A clean break means the thread is in good shape. A fray or shred means you have problems. You can try and revive old thread with silicone spray. But again, what is your sanity worth?
Last but not least (not wanting to leave you traumatized by all this talk of thread breaks!) let’s take a look at some production friendly tips.
For starters, I like to keep a thread color card, one with real thread wrapped on the card vs. printed samples, in my sales area to show customers—highlighting my in-stock colors in order to make selections that much quicker and easier. If a customer requests a special color, I tell them I’d be happy to provide it for an additional fee, at which point the customer usually decides the shade I already have in stock is just fine. That said, when a larger order or repeat business wants a unique color, I stock what they’re asking for at no additional charge.
Another thing I do to help process larger orders quickly is place the threads being used next to each other to cut down on the travel time between needles when the elements in the design change colors. I also put commonplace colors like white and black toward the center of my thread tree to cut down on the travel time between them and the others being used in a design. Think of it as being like the most direct route vs. the scenic route on a road trip.
Lastly, I keep a laminate of the thread tree layout for each machine on hand and write in the color name or thread number for each thread with a wet erase marker. While setting my design colors I can therefore glance at the laminate vs. what’s on the machine, which helps me more efficiently process orders while avoiding making the mistakes that can result from looking back and forth to the machine and a screen. I also make a point of writing the name of the machine on the laminate that goes with it. And yes…I name my machines!
Katie Wubben is the owner of Trouble Me Knot Embroidery, an embroidery training company and distributor of a wide range of embroidery supplies, including everything from needles to bobbins, backings and, yes, thread and HoopMaster products. Wubben also sells Melco and SWF embroidery machines and is a veteran presenter with the Impressions Expo’s educational conference program as well as a number of other shows around the United States. For more information, go to troublemeknot.com.


