
An example of a test swatch intended to show how a particular thread will interact with the material of the garment on which the author was planning to embroider a particular design. Photo courtesy of Erich Campbell
In Part 1 of this two-part series, we will learn how to identify and isolate problems in our embroidery, so we can understand where we need to intervene from a digitizer’s perspective. We’ll look at how to recognize where and how things go wrong and address problems with a holistic view of embroidery in mind.
As we do so, we will concentrate on finding faults starting from the design creator’s perspective but venturing into machine and execution issues as well: addressing everything from common design interpretation and digitizing problems to garment instability and material mismatches.
Bear in mind, at the end of the day, embroidery requires a holistic approach. Though we’ll focus on digitizing, it’s only one piece of the puzzle. Using suitable materials, setting up your workpiece correctly, and mindfully maintaining and operating your equipment are all necessary parts of getting the results you want from your embroidery. Ignoring any part of the whole will reduce your success.
Not only can there be a world of difference between one design or one garment and another in terms of how they embroider, different approaches to solving a particular problem can also have similar results. It’s obvious there’s no single right way to handle problems with all design and material combinations, but it’s also true there’s more than one way to tackle problems even in a single piece.

If you understand the basic forces at work on each stitch, how they interact, how materials hold up to distortion, how embroidery “works” on a fundamental level, you’ll be able to correct problems. This is true even with seemingly complex designs. If you can isolate issues, reason out the “why” behind them and think somewhat scientifically about possible changes and resulting tests, you’ll be able to develop and target solutions with confidence.
On a side note, in Part 2 of this series we will go on to look at the specifics of everything from letter counters and escaped underlays to density problems and sequencing errors. To see Part 2, click here.
Isolating Problems: Digitizing vs. Execution
Whenever we have a problem with embroidery quality or in the smooth and continuous running of our designs, the first question is usually whether the digitizer did their job correctly—that or if there’s a potential problem with the materials or way the equipment is running.
Today’s digitizing software can be admittedly impressive. However, a good digitizer will be prepared to alter the final thread path to ensure the design looks as good in the real world as it does on screen. Photo courtesy of Erich Campbell
In some instances, it can be incredibly difficult trying to discern which side of the process is problematic. An embroiderer using an inadequate stabilizer, for example, might see things like registration issues due to the material shifting and distorting. Though this might be mitigated by editing the design file to increase overlaps or shift borders, using the proper stabilizer and slowing the machine might achieve a similar effect, depending on how far the outline is from hitting its mark.
Bear in mind, digitizing issues tend to be predictable. Especially in the case of issues like thread breakages, problems with a digitized file will typically happen more or less at the same point in the design over the course of repeated testing.
If, for example, you are seeing thread breakages at random intervals, there is likely a problem with the thread path or the needle; whereas the thread breaking reliably at the same place in the design means there are likely overly short stitches or some other issue in the design causing undue stress. This part of the design may also be encountering a problematic seam or some other structure that could be causing abrasion or snagging.
Similarly, other issues, like “escaped” underlay or gaps between borders and fills, may be the result of any number of contributing factors; if, for example, they are not regularly at the same location in the run, changes in digitizing are far less likely to help.
Again, if a fault isn’t occurring regularly at the same time and in the same place, it’s likely not digitizing, or at least not a digitizing fault alone. The reason for this is that while digitizing issues affect stitch placement and shape, they don’t affect tension. Though there can be some issues with excessive density or detail causing textural issues, digitizing alone will not create looping in most areas of even fill; nor will it bring bobbin thread unduly to the surface on a satin stitch.

A classic example of registration issues resulting from a fill area that doesn’t quite match up with the surrounding boarder. Photo courtesy of Erich Campbell
By contrast, some the distortion of shapes will often occur due to the structure of a fabric, issues with thinning satin stitches, circles that look like ovals, other distorted shapes or underlays, and travel stitches escaping their top stitching can be addressed in digitizing. Note, that while there may be a “middle ground” of settings digitizers use for stock designs, there’s no one amount of pull and push compensation, no one type of underlay, or one setting for density that will solve all issues on all material substrates.
At the end of the day, digitizing is “good” if and when it performs as expected on the materials for which it was intended. Switching the environment by using vastly different materials, stabilizers or changing some other variable at the machine can impact the design negatively, no matter how well it was created. Similarly, a good design for shirts may make for a poor design for structured hats, no matter how great the shirts look. Same thing when stitching on a particularly difficult material, like those with a great deal of loft, texture or stretch.
With this in mind, in order to properly isolate issues with your embroidery, you should take the following precautions:
Control your environment: When testing designs, use “best match” materials and machine settings for the final embroidery setup you’ll use. Combine the stabilizer recommended for your project, add fabric that matches the construction and relative contrast to your final embroidery, and run at the speed with the hoop you intend to use to get your ultimate result.
Review the Preview: Before stitching, use the “slow-replay” feature of your software to review your stitch file for obvious digitizing errors like extraneous jumps, trims, and color changes as well as copy-paste errors (doubled copies of letters and/or elements), missing ties, extraneous jumps, and/or stitch filtering issues (missing long or short stitches).
Wait and Watch: If you are testing a design for the first time or are trying to identify a problem seen in a sample for which you weren’t in attendance on the initial run, take the time to be physically present and watch the testing run. Watching the interaction between the stitches and materials live can be incredibly instructive, showing fabric movement and distortion, issues with sequencing, and much more as they happen in real-time. For ease of recording, print a copy of the design preview. Circle areas and add notes during the run to identify problem areas you’ll need to review in the file.
In sampling your design, any errors will become visible. If you have taken the additional step of watching them run, you will likely have a solid handle not only on what looks incorrect, but what ran poorly during the embroidery process. With an understanding of the stresses common to embroidery, we can then identify whatever issues may exist and intervene, making changes to our files (or asking for them from our digitizers). We can also, if necessary, change how we use our materials and machines.
Defining Distortion: Pull and Push
Pull Distortion happens in every stitch. As the stitch is formed and pulls tight, it slightly shortens along its length, pulling on the enclosed material like a kind of drawstring. This in turn means a column of stitches will be narrower in the actual thread than it appears
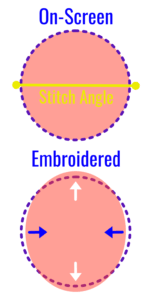
When digitizing circles, it’s often necessary to adjust your digitizing to ensure you don’t end up with an oval instead. Photo courtesy of Erich Campbell
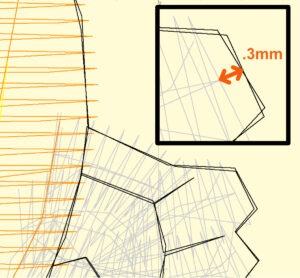
on-screen. It will also slightly gather the material inside the stitches. This kind of distortion can vary with the stability and thickness of the material you are embroidering, the tension of your thread and the resistance of your stabilizer. Even on stable materials, you will typically see a satin column thinning somewhere between 0.17mm and 0.25mm. The same occurs in fill stitches, though the effect is less pronounced.
To compensate for pull, draw your shapes slightly wider along the stitch angle so that they arrive at the intended width when stitched. You may also try and use whatever automated “pull compensation” settings you may have at your disposal to tune in this additional width until the desired thickness is reached.
Push distortion, on the other hand, happens when stitches laid close together try to push each other and the threads in the underlying garment apart as they work to position themselves in a single layer. In a satin stitch, push distortion will cause the stitches to push out toward the ends of the stitch column. As a result, if you create a vertical column of satin stitches in your software, like those found in a sans-serif uppercase “I,” the embroidered letter will be slightly taller than the one you see on your screen.
Though the severity of this kind of distortion varies depending on your combination of the base fabric and stabilizer, push distortion is often between 0.13mm and 0.20 mm for a full-density column stitched in 40wt thread.
Push distortion happens in blocks of fill as well, in a direction perpendicular to the fill’s stitch angle or inclination. To compensate, a digitizer should create a slightly shorter shape in the direction perpendicular to this same stitch angle, allowing it to expand into the final desired dimensions.
Other Common Machine Emroidery Distortion Issues
Registration Issues: When elements like edges and borders don’t line up, or register, with other objects as they should, it’s usually due either to inadequate compensation for pull and push distortion or a mismatch between the performance of the garment and stabilizer the design was intended for. If you hoop reliably with the correct tension and use appropriate stabilizers, any problems in the file can be corrected through minor edits.
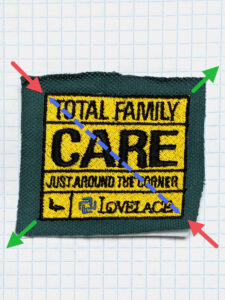
An example of what you can end up with if your digitizing doesn’t take into account the effect the stitches you’re using will have on the underlying material. Photo courtesy of Erich Campbell
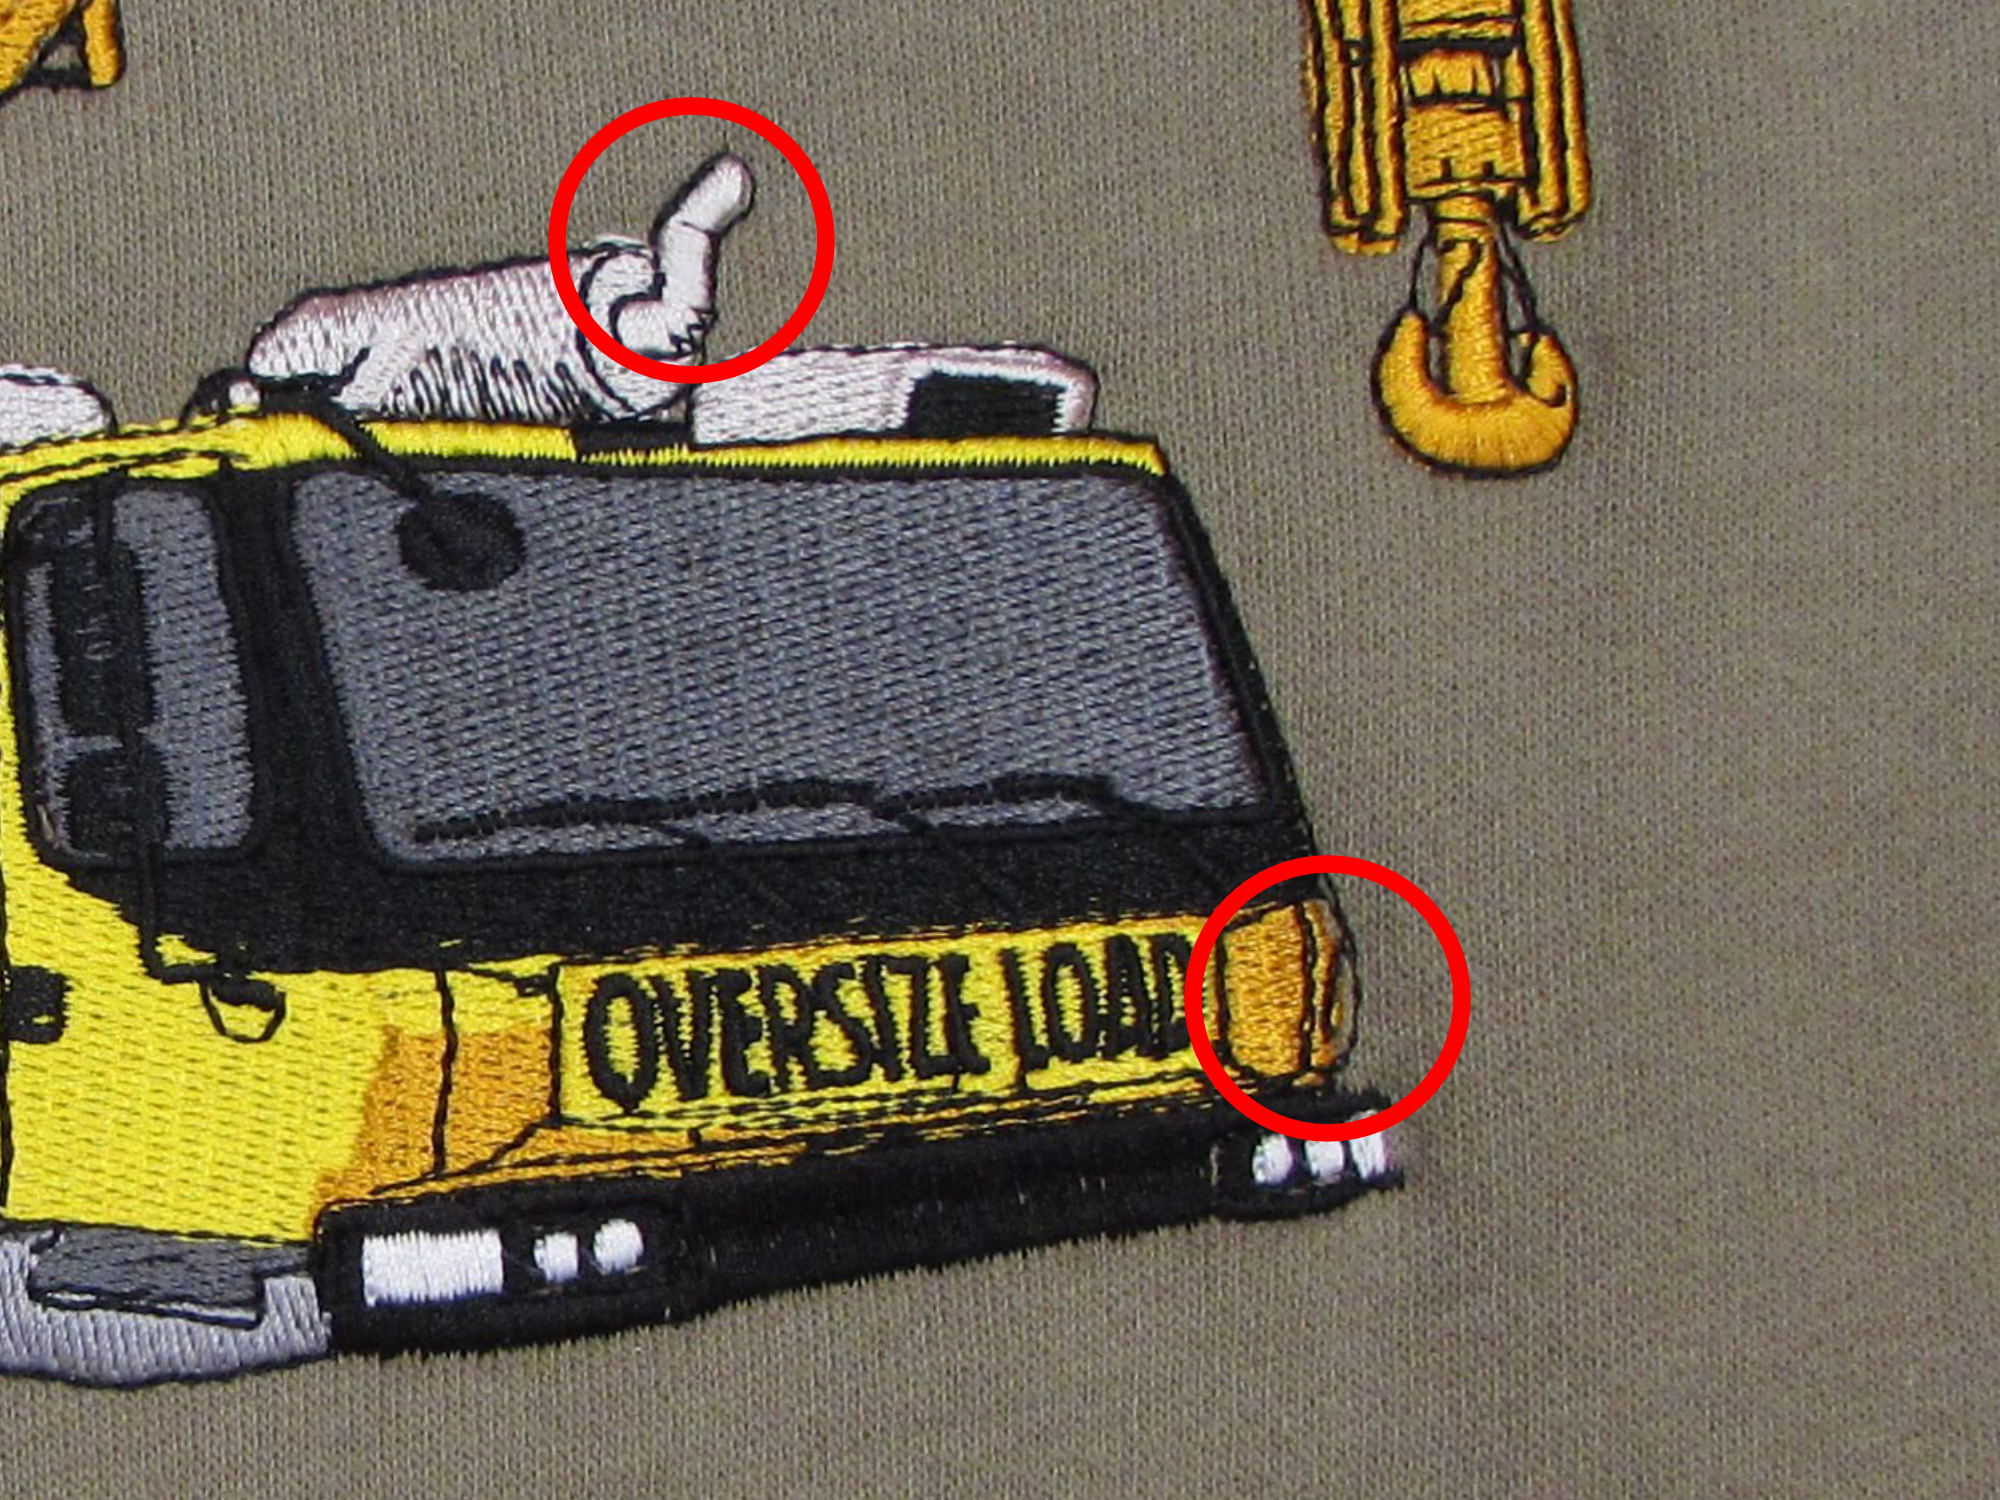
Straight Stitch Borders: When open ends of satins or fills push beyond their intended borders, fixing the problem requires adjusting how far the satin or fill element stops short of the border. For a standard full-density satin stitch in 40wt thread, the element should end at least 0.17 to 0.20 mm before the border in the angle of push, though these values are not universal. If your sampled stitch block pushes beyond the border by 0.50 mm, open your file, measure back from the current end of the satin stitch 0.50 mm, and either move the end of the element to that line or remove stitches until you reach that point.
Border Gaps: When a fill or satin stitch fails to meet the edge of a stitched border or block immediately next to it, leaving an undesirable gap, it requires additional pull compensation. As the stitches “pull” under tension, this pull will often create gaps when elements are digitized with little to no area overlapped by the border, particularly on easily distorted materials. The simplest way to fix this problem is to increase the overlap by extending the edge of the underlying element deeper under the border.
If you have the original file, you can also find the edges of the underlying element and move their control points to extend further under the border or other element that they are not meeting. Since we know the stitches will pull, we’ll want to overshoot the actual line where we want them to end. Without the original file, you may be relegated to manually selecting and moving the edge stitches.
As indicated earlier, automated tools exist to help deal with these kinds of situations in certain stitch-editing packages even if you can’t access the original files. However, they are specific to their host software and may not be available in all suites.
Shape Distortion: Pull and push forces can also lead to shape distortion. This issue can be seen in circles, especially, requiring them be redrawn wider along the stitch angle of the design and shorter perpendicular to the stitch angle in order to arrive at the desired shape. To counteract this kind of distortion, measure the deviation from the desired shape on both axes and shorten or widen the shape in the direction indicated by the distorted version.
Note: While the most common angle for fill is nearly horizontal (as vertical fills can interact poorly with fabrics, falling into vertical ribbing with some knits or into vertical seams on caps, causing show-through and warping) horizontal fills suffer when flat-topped or bottomed shapes are outlined with satin stitch, as the overlapping satin pulls apart rows of fill stitching, causing show-through.
Trying to prevent a satin stitch from “grabbing” these rows by using a 45-degree angled fill can, however, cause undue shape distortion as many materials stretch considerably on the 45-degree angle to their grain. An angle as little as 15 to 20 degrees off the horizontal is generally enough to reduce this edge splitting effect without excessive distortion.
Erich Campbell is an award-winning digitizer, embroidery columnist and educator, with more than 20 years of experience. He also is the program manager for the commercial division of BriTon Leap. To reach Erich directly, go to his web site, erichcampbell.com. Again, to see Part 2 of this series, click here.


