Even if you plan on outsourcing your embroidery digitizing, it’s important to know how the process works
If you are reading this, you are likely stitch curious. Your customers probably keep asking whether or not you can stitch those hats or high-end shirts they’re interested in purchasing, making you wonder how much you lose whenever you turn them down or send them to someone else.
At the same time, you’ve seen all those machines at trade shows with all those needles spooling thread off their multitude of cones, creating a cacophony off tapping “feet,” following a path set by some software tool you’re thinking you could never hope to decipher in a million years.
Not to worry, it’s OK to feel a little overwhelmed. True, anyone selling you the dream of fully automated art conversion to stitches or a “hoop it and forget it” experience is painting far too rosy a picture. However, the realities of embroidery and the process of preparing art for actual sewing aren’t as onerous as some may have you believe, provided you take the time to learn the basics.
What Exactly is Machine Embroidery Digitizing?
Simply put, digitizing is the process by which an embroiderer translates a given piece of art into an embroidery design file—although that’s where the “simple” part pretty much ends. What actually happens during the process looks a lot more like redrawing the art, as opposed to just duplication. To be successful, a digitizer needs to assess the art, taking into account the natural stresses of embroidery, the way thread behaves, and the material qualities of the garment and support materials being embroidered to determine what type of stitches should be used in what position and in what sequence. The digitizer then establishes certain parameters regarding how far apart the stitches should be to create color coverage, how much they should overlap to obtain proper registration and the sequence needed to remain stable on a garment and stitch efficiently.

To do all this, digitizers draw vector-like shapes specifically altered from the original art to suit the needs of embroidery, filling those shapes with stitches by entering the necessary parameters that determine how those stitches are generated, including additional settings that deal with the natural distortion that embroidery creates in a garment.
With this in mind, in practice actual software operation is only part of what a digitizer needs to know. The real trick is knowing how the embroidery process itself works and how to use thread to reproduce what is critical in the original art. Technical knowledge of the materials and machines employed in machine embroidery as well as the aesthetic knowledge needed to handle the limitations of embroidery and take advantage of the texture, sheen and dimension it offers are the real tools of the digitizer.
The Feature No Embroidery Digitizing Software (Really) Has
Again, despite the best attempts of great minds, digitizing software doesn’t automatically convert images to embroidery in the same way a digitizer does. There’s no process at this time capable of analyzing an image and creating a high-quality embroidery design that runs efficiently and keeps all outlines and shapes properly registered with the aesthetic quality and consistency provided by a skilled digitizer.
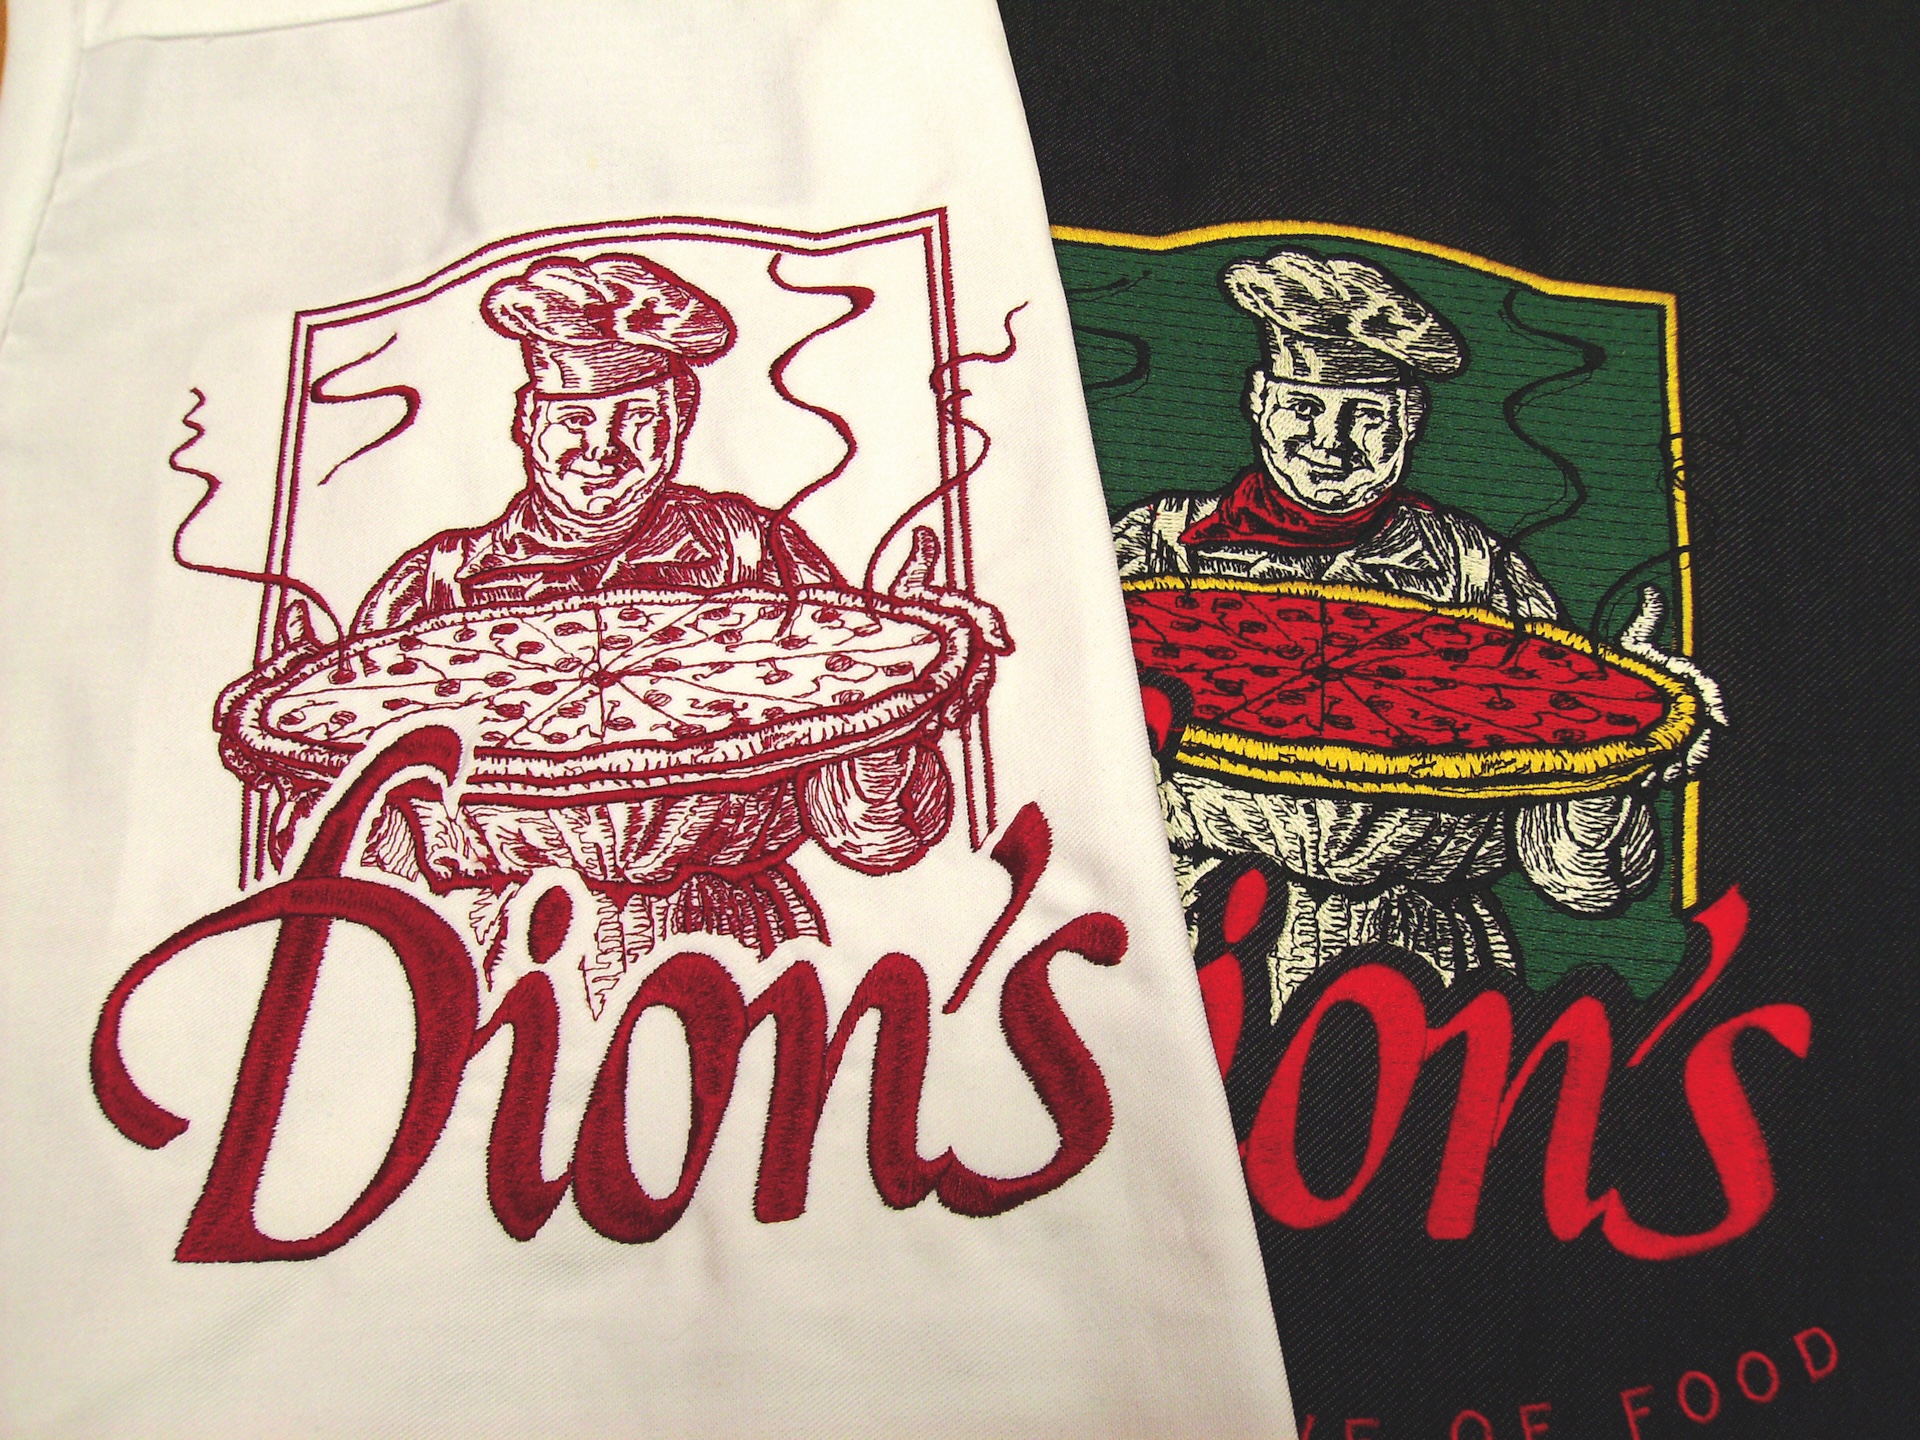
An example of the digitizing that goes into creating a piece of machine embroidery. Image courtesy of Erich Campbell
In particular, no current automation uses the material qualities of thread and the dimensional quality of embroidery to their best advantage. This isn’t to say automation can’t assist in the creation of embroidery, just that it’s not yet a one-click process.
Of course, anyone who has had even a brush with the embroidery world knows there are innumerable overseas and local digitizers would like nothing better than to create the design files you need. Unfortunately, all too many prospective embroiderers take this to mean they are now free from the burden of knowing anything more on the subject, which they most certainly aren’t.
Assuming your digitizing needs are entirely someone else’s concern can be problematic, to say the least, as a lack of understanding can leave embroiderers in the dark and unable to communicate their needs to their outsourcing partners when issues arise. Granted, you may never need to actually digitize. However, you still need to know the basics of how embroidery works, including the material portion of the process, and have a decent understanding of what digitizers can (and can’t) do. You also need to understand the limitations of the medium, have a basic understanding of how to interpret designs into stitches and be familiar with the common problems that can occur due to both digitizing and machine issues if you hope to provide designs that please picky clients and/or be able to ask for any changes that may be needed to correct production mishaps.
Need to Know Info: Machine Embroidery Terms, Types, Troubles
The two most misused and yet most necessary terms to understand when it comes to machine embroidery are “density” and “compensation.” When diagnosing issues with your embroidery, it’s very important to know the difference and know how to ask for proper corrections in the event things go wrong.
Density refers to how close together the rows of stitches are placed in a given object. Density is almost always measured in terms of the space between the stitched rows, meaning as the number used to represent density gets smaller, the number of stitches in the area grows. For example, .4mm, or 4 point, density means there’s a 0.4mm gap between passes of stitching across and back to the origin side of the object. By way of comparison, .5 or 5 point density will be sparser, showing more fabric.
The nature of machine embroidery is such that the finished project will invariably look slightly different from the digitized image on screen. Image courtesy of Erich Campbell
In the event an object doesn’t have enough coverage, i.e., you can see too much of the background color, increased density or the addition of structured supporting stitches under the design to lift the top stitching and increase overall coverage (also known as underlay) may be called for. When, on the other hand, a design is too packed with stitches and the fabric is warped or cupped, or shows extensive push distortion (more on that in a bit), decreasing density is generally the right call.
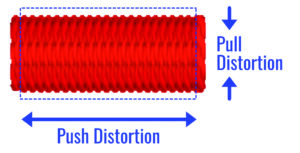
Compensation refers to the alteration of stitches or objects to counteract the natural stresses of machine embroidery. Stitches are created under tension along their length, pulling the material of the underlying garment toward the center of the stitch, thereby shortening it. This in turn will make an embroidered area narrower along the stitch angle than it appears on screen in what is known as pull distortion. In response, pull compensation, whether applied as a setting or drawn into the design manually, is used to thicken or widen objects and strokes in the angle of the stitches in order to get the look you want.
Conversely, as stitches fill an object, the space they take up and the pressure they exert against one another will push the stitches in a direction perpendicular to the angle, or direction, of the stitches. This is known as push distortion. To accommodate this phenomenon, push compensation is usually manually employed. Specifically, digitizers will draw the edge of an object inside the intended final edge so that the eventual stitched result perfectly aligns with any fine line borders or outlines around the object.
Failure to achieve this balancing act will result in distortion in an embroidered piece. For example, if a digitizer lazily draws an uncompensated perfect circle and fills it to complete coverage, it will invariably become narrower via pull distortion and lengthen due to push distortion, resulting in an oval. The digitizer therefore has to manually draw a compensated, slightly oval shape to stitch an actual circle “in the thread,” as it were.
In addition, the other most common issue seen with respect to compensation is misregistration. In this case, if the objects in question are not overlapped deeply enough in the primary stitch angle, pull distortion will result in the creation of gaps in between them and their outlines.
Similarly, if an object is not drawn “short” of a narrow border in the dimension perpendicular to a thin outline, it’s likely to “blowout,” in which case the filled object’s push distortion causes it to extend beyond the intended border.
Basic Machine Embroidery Stitch Types: The Big 4
The primary stitch types common to all machine embroidery are Manual, Straight, Satin and Fill. Though important variations on these types exist, as do many additional stitch types, these are the stitches that make up the bulk of most of the designs you’ll be dealing with. Being able to tell them apart and knowing how they are constructed can help you ask for them or refer to them when explaining design problems.
Manual Stitches
This is the most basic, yet least implemented stitch type. To create a manual stitch, one defines the beginning and end of each stitch manually, controlling the angle and length one stitch at a time. Manual stitches are used in artistic digitizing, particularly for organic textures and fine details: think fur for animal renderings, fine facial features, designs made to mimic hand embroidery and anywhere individually placed stitches of varied length and angle are desirable.
Run(ning) Stitches
An example of a piece of embroidery created using a series of running stiches. Photo courtesy of Erich Campbell
A line of repeated single stitches used for any line or detail under 0.8mm in thickness is called a running stitch. Its look is altered by varying stitch length, with longer stitches reflecting more light and appearing brighter and smoother than the pebbly, tight look of shorter stitches. By varying how many passes we run over a particular line in our art, we can also create thicker running stitch lines. When doing so, these are generally composed of stitches of the same length. However, today’s digitizing software can also vary the stitch lengths automatically. Straight stitches are typically used in detail work, for manual shading and outlining. Worked in dark threads on a light background, they can be used to create solid-looking fine lines, perfect for engraving or woodcut-styled designs. That said, these kinds of lines can also appear broken and rough due to differences in light and shadow when stitched in a light thread on a dark garment.
Satin Stitches
Sometimes called a “column” stitch, satin stitches track back and forth over a narrow area, alternating between a straight stitch and an angled “return” stitch. Zoomed in, these look like a zigzag, with every other stitch tracking along the stitch angles set by the digitizer, usually perpendicular to an object’s edges. The satin stitch provides a shiny finish due to the unbroken, long threads in all those straight passes, hence the name satin. Satin stitches are most often used for narrow elements, like borders, strokes in lettering and any item or line that is more than 0.8mm wide, but less than 10.0mm wide at its widest point. Large elements can also use the related “split satin” or “length limit” stitch to break overly long stitches into shorter stitches that are still long enough to provide shine without risking the use of easily snagged, slow-to-stitch satins with widths above 10.0mm.
Similarly, the difference in brightness between differing stitch angles as well as the variation in the brightness from the “crown” of a satin stitch to its darker edges makes it a natural choice when creating texture or a play of light over a design’s surface. By varying the angle of the stitches between elements, for example, a pair of satins in the same thread color will be perceived as different due to the variation in the amount of light directed toward the viewer’s eye. With this in mind, satin stitches are often used to create feathers, leaves, cylindrical objects on machinery, facial features, fingers or any other narrow item that has a perceived dimension in it.
Fill Stitches
Also known as “Tatami” stitches, this stitch type is used to cover wide, flat areas in a design, particularly those wider than 0.10mm. It is composed of rows of stitches, typically placed very close to one another so as to completely cover the ground surface. The stitch penetrations in a fill are also usually shifted from line to line in such a way that they create a look much like that of woven material, hence the name Tatami, after the traditional Japanese woven mats. Fill stitches provide a flatter look and less sheen than a satin stitch, but can fill a much larger area while avoiding the rippled texture of overlapping satin columns.
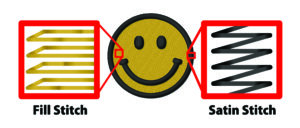
A schematic representation of the differences between fill and satin stitches and how they’re used in the real world. Image courtesy of Erich Campbell
Fill stitches can be altered by changing the stitch length, density and alignment of the stitch penetrations to create a variety of textures. Modern digitizing software even allows for curved stitch lines, allowing digitizers to suggest dimensional contours across surfaces. The stitches can also be made to look more “organic,” so to speak, by using randomized stitch lengths to break up an otherwise smooth stitch pattern.
Digitizers use fills for flat items like body panels in machinery, walls in buildings or any other flat expanse of color. As with satin stitches, the angle of a fill changes the way light is reflected off whatever thread you’re using, making it possible for digitizers to recreate any reflections that may exist in the art they’ve been given. Varying stitch angles can also be used to differentiate two or more objects that are contiguous to one another and of the same color.
Finally, color-blended or gradient work is usually executed by creating carefully placed layers of light-density fills to facilitate the requisite interleaving of differently colored layers of stitching at a single stitch angle. Though traditionally for broad surfaces, fill stitches can also be used in smaller areas to create flat, regular finishes or increased durability compared to an area of more easily snagged satin stitches.
Common Difficulties in Machine Embroidery Art Interpretation
Unlike, say, direct-to-film (DTF) or direct-to-garment (DTG) decorating, digitizing and embroidery constitute an art of “interpretation,” as opposed to simple reproduction. Knowing the nature of those design elements that can be more difficult to capture and how to handle them will therefore help you discuss potential problems with customers and avoid downtime due to unaddressed issues in your initial art.
Part of the job of a digitizer is deciding what can and can’t be represented effectively with respect to the original art they find themselves having to work with. Photo courtesy of Erich Campbell
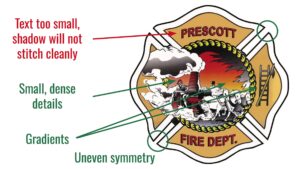
Tiny Embroidered Text
When using standard thickness embroidery thread (referred to as 40 weight, or “40wt), the smallest stitch that will reliably keep from sinking in is about 0.1mm in length, making the thinnest stable satin stitch roughly 0.1mm in width. The smallest gap that will stay open, on the other hand, is roughly 1.0 mm in diameter, making the smallest letter that will be reliably legible and sew cleanly about 0.5mm in height. The smallest letter in your text should meet this norm, meaning mixed case text will need to be taller.
Even if we employ smaller needles and smaller thread, like the 60wt thread, we only reduce the safe letter height by roughly 25 percent, at which point we may experience stitch quality issues on textured or coarse materials, in particular. Due to the limited decoration areas found on many items, customers’ text often ends up under this limit. You will therefore need to reconfigure the text if it is deemed necessary for the design.
Color Gradients and Blends
Though some shops now employ print technologies that may make this simpler, when it comes to standard embroidery any thread is an object of a single immutable color. As a result, the only way to blend colors smoothly is to intersperse stitches of multiple solid colors in an area. This is a largely manual process that can be difficult execute, time-consuming and harder to make profitable. You will frequently need to reduce the extent of, or even eliminate the inclusion of gradients, photographic textures and other difficult color shading in order to render a design properly.
Overly Dense Detail/Stitching
As with small letters, overly packed detail can be difficult to replicate. To compensate, such details will often need to be enlarged, simplified or spaced out in order for them to stitch cleanly and remain visually distinct. In practice, even manually placed stitches will essentially become fill or satin stitches when spaced too close together, thereby obscuring any detail you may be trying to convey.
Stitching It All Together
Again, the world of in-house embroidery can rightly be daunting. That said, the reward is the type of higher margin, luxury product beloved by customers for literally centuries. In addition, the barriers to entry are lower today than ever before thanks to an abundance of possible outsourcing partners, less expensive software packages and machines that are easier to operate as well.
Ultimately, the most important thing to keep in mind for those looking to branch out into stitching is to avoid trying to treat embroidery like all the other processes out there, whether it be in the areas of pricing, execution or sales. Embroidery isn’t print, but if you push through the initial discomfort, you will find a premium product with peerless visual and tactile appeal that’s sure to pique your clients’ interest.
Erich Campbell is an award-winning digitizer, embroidery columnist and educator, with more than 20 years’ experience both in production and the management of ecommerce properties. He is also the program manager for the commercial division of BriTon Leap. To reach Erich directly, go to his web site at erichcampbell.com.


