- Clarity is key to ensuring the logos and other images your decorated apparel customers provide you with don’t gum up the works
- Problematic artwork slows production and can lead to costly reprints if not corrected prior to printing
Anyone who’s been in the garment decoration industry long enough has had to deal with the same issue: customers sending in artwork that simply isn’t usable. Maybe they provide an image they pulled from a website, maybe it’s flattened onto a background, maybe it’s the wrong type of file. These are just a few of the possibilities.
Whatever the case, problematic artwork slows production and can lead to costly reprints if not corrected prior to printing. The good news is with the right processes you can turn even the messiest art submissions into smooth, predictable jobs.
Knowing What Image File Types to Look For
First things first, what makes for problematic artwork? There are many things that can make artwork unusable. One of the most common issues is the image is too small or not at the correct resolution.
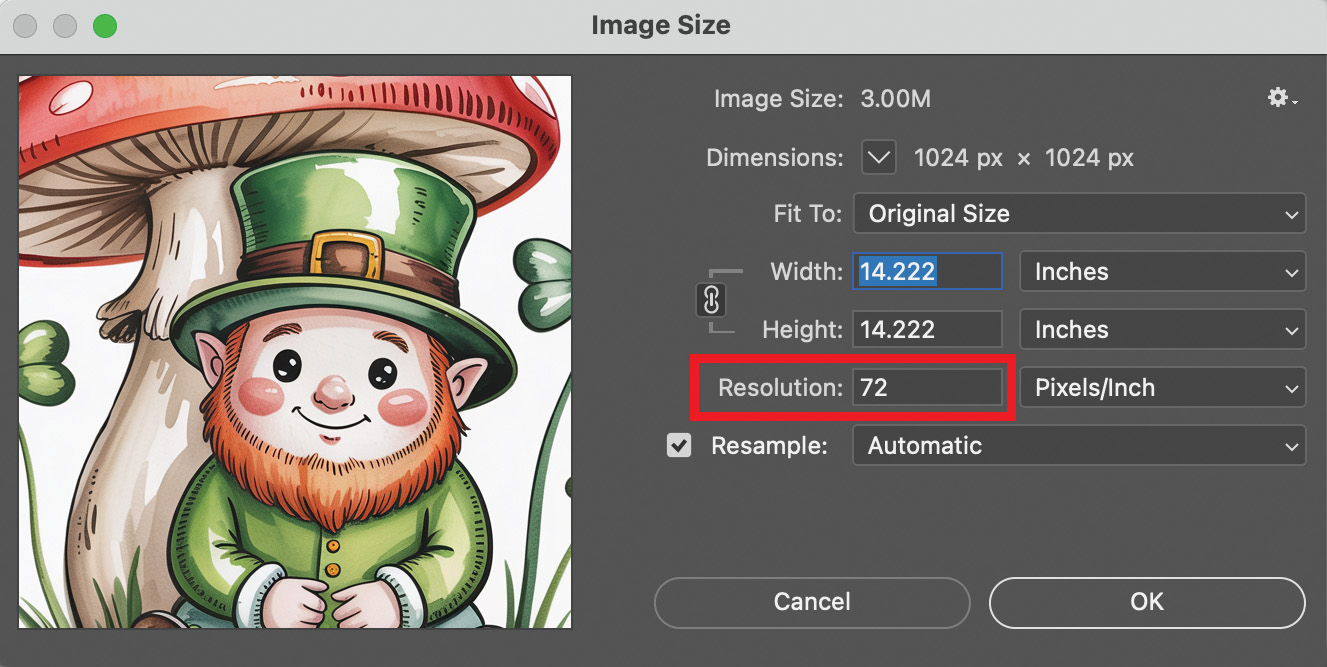
Logos pulled from a website or images created using AI are usually much smaller than what will be required for printing. The resolution is also usually lower than required, making the image blurry or pixelated. In the case of the image at the top of this article, for example, it may look good on screen, but with a resolution of 72 pixels/inch, it’s not in a presentable state. Not only that, but if you try to enlarge it to the proper size and resolution, it’s only going to get worse.

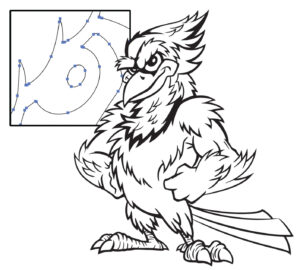
Vector images, like this one, are made up of nodes and paths. Image courtesy of Dane Clement
Unfortunately, with the popularity of AI apps and their ease of use, anyone can create an image, so this problem will in all likelihood only become more common. It’s therefore important to let your customers know up front what you require in terms of size and resolution depending on the production method used. Actual size and 300 pixels/inch (pixels per inch, or ppi) for resolution is a good recommendation for most processes.
Another issue many customers have trouble with is the difference between vector and raster files. Raster artwork consists of tone images made up of various colored pixels. Examples include photos, digitally painted illustrations and most AI-generated art. As such, they are dependent on the size and resolution restrictions mentioned above.
Vector artwork, on the other hand, is made up of points, or nodes, and paths, meaning it can be enlarged indefinitely without losing quality or sharpness.
Because of these differences, making sure you’re being supplied with the right type of artwork is crucial. Granted, there are many processes out there that can be used with both types of files. However, some, like vinyl cutting, require vector artwork exclusively, because the cutter needs to be able to make use of the nodes and paths in order to know where to cut.
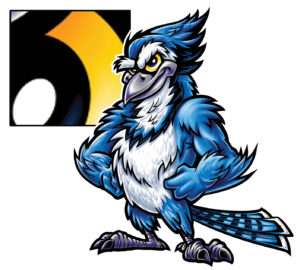
Raster images, like this one, are made up of colored pixels. Image courtesy of Dane Clement
Along these same lines, knowing the right file format in which to save a file is also important. Regardless of whether you create a raster or a vector image, there are tons of file formats out there with each process or production device requiring the correct type of file format in order to do its job correctly.
Vector file formats, for example, include, but are not limited to, .AI (Adobe Illustrator), .CDR (CorelDraw), and .PDF (Portable Document Format) images. Both .AI and .CDR files are native to those programs, with .AI files, in particular, being industry recognized to the point they can often be recognized by other software and production equipment.
.PDF formatted files can be created using both vector and raster programs. When saved from a vector program, like Illustrator or CorelDRAW, the file can even retain its vector characteristics. However, if it is saved from a raster program, like Photoshop, it will become a raster image.
.PSD (Photoshop), .JPEG (Joint Photographic Experts Group), .TIFF (Tagged Image File Format), and .PNG (Portable Network Graphics) files are among the most common raster file types. They can all be created from both vector and raster software programs, but will always be saved as a raster image regardless of the program they were originally saved from.
JPEGs have been around for a long time and are often used with digital cameras, because of their small file size. Be aware, though, that a JPEG employs a “lossy” type of compression format that can result in resolution problems. In practice, some high resolution JPEG files may be OK to work with. However, in general I do not recommend working with them. When files are saved this way, the loss of information can be seen as pixelization in your image, which can then be picked up in your final output, creating an inferior result.
Beyond the Basics: Issue with AI Images
In addition to making sure you receive the proper art and file type at the proper size and resolution, there are a number of other elements that can cause kinks in the process. One of the biggest is receiving artwork on a flattened background, another problem that is becoming increasingly frequent in the new age of AI.
When generating artwork using AI apps, the image is almost always created on some kind of background. However, this can quickly become problematic due to the fact raster artwork needs to be supplied on a transparent background to work well. It’s therefore a good idea to let your customers know this up front so they can create their artwork accordingly and set up their file, or files correctly from the beginning.
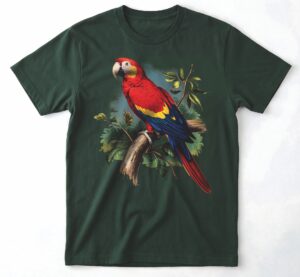
A common problem with raster AI images is the fact they’re created with backgrounds, like the image at top. To work well, these backgrounds need to be removed, so that they look like the one above. Image courtesy of Dane Clement
Unfortunately, if they are using AI to create their image, they often won’t know how to remove the background, in which case it’s up to you to explain how. They may, for example, be able to use a remove-background option if the AI app they are working with has one. Be warned, though, depending on the artwork, the program might not remove it cleanly.
Another common issue with supplied artwork is missing fonts. If an art file is provided with active text and the font is not supplied, the type in the layout may not open correctly, in which case the software may default to a different font or the placement may shift. Asking the customer to supply the font is an option. However, that will also mean your having to go through the process of loading it, in which case there could still be issues. The best thing to do is have your customer convert the text to paths in a vector layout or rasterize it as part of a raster image.
Getting back to the question of image size, in the same way a small raster can be problematic, the reverse can also be true. When, for example, small applications are required, such as a left chest or cap, taking a large image and reducing it down can be an issue. Lines, in particular, may become too thin to work for vinyl cutting or direct-to-film (DTF) printing. Similarly, text or some other kind of smaller element may become too small to hold onto the screen for screen printing or become illegible as multiple inks start bleeding into one another.
Finally, when it comes to printing, color modes and profiles can be problematic. Different printing methods and devices, for example, require different settings. Most printer manufacturers will want a PNG supplied in an sRGB, or “standard” RGB, color profile, but some may require CMYK.
RGB offers a much broader color range than CMYK, which means more color data is sent to the printer for a richer, better print. However, if the artwork was created in RGB, the customer may need to change to CMYK to meet your requirements. If that’s the case, be sure and let them know what you need in advance, since the color will change between RGB and CMYK, and you’re going to want them to make sure the file is set up accordingly.
Getting the Message Across for Custom Apparel Clients
Again, these are just some of the artwork issues you may come across when dealing with your customers in the industry. Not matter what the exact problem, though, the question becomes, “How do you handle any problems that may come up with artwork?”
The first thing to do is be proactive. Provide as much information as you can up front. Provide a spec sheet with all the information and specifications you require for the different production methods you offer. When you do, either during an in-person meeting or on your website, be sure and include some examples of good versus bad artwork to better illustrate how the artwork should be provided.
Let your customers know the file formats you accept, the color mode you use, and the required dimensions and resolution you’re going to need. If they are providing raster artwork for their job, make sure they know it needs to be on a transparent background.
While you’re at it, maybe let them know how to rasterize any active text they may be including and/or how to convert it to paths in a vector file. Also be sure and let customers know upfront what your rates are for any added art services that may become necessary. Providing this kind of information well ahead of time will go a long way to helping nip things in the bud.
That said, most customers still won’t get it. For this reason, it’s always a good idea to look at the artwork you’re being provided with as soon as possible to check for any issues it might have. That way you can get back to the customer and ask them to adjust or provide a new file before you find yourself having to deal with an imminent deadline.
When explaining artwork issues to your customers, avoid technical jargon. How you communicate any problems you find to your customers can be as important as spotting them in the first place. Keep your language simple and supportive. The goal is to make customers feel guided as opposed to corrected. Don’t just tell them their art won’t work. Tell them why it won’t work and what would happen if you tried to actually print it.
While you’re at it, be prepared to offer solutions. Sometimes the issue may be easy enough for a customer to take care of themselves. Other times, though, it may require more than they’re capable of. Let your customer know if it’s something you can fix and if there will be a charge for doing so. Many shops successfully turn artwork problems into opportunities by offering paid services.
Regardless of whether you end up with artwork that is problematic or not, it’s essential to set boundaries and establish clear policies. This includes the level of cleanup you will include for free, the kind of work that requires an additional fee, the length of time revisions will take and how many revisions are included before additional charges apply. Make sure customers sign off on any and all proofs before anything gets printed and make artwork approval deadlines are part of your overall timeline. Policies bring consistency and prevent unnecessary back-and-forth and/or last-minute rushes.
Let your customers know you will be checking their artwork before you do any actual printing. Once you do, if everything is good to go, you can let them know when to expect their job is going to be done. If there is a proofing process, be sure and let them know when they can expect their proof. Same thing in the event you have to work with the image they provided to make sure they are happy with the changes you put in place.
For better or worse, dealing with problematic artwork is part of the territory. That said, it doesn’t have to be a struggle. With a clear process in place, you can turn difficult files into great results. More importantly, you create a smoother workflow that protects your equipment, your time and your reputation for quality.
Dane Clement (daneclement.com), is VP Executive Creative Director for GroupeSTAHL. He has been speaking and writing for the decorated-apparel industry since 1995. He has also authored several artwork-training books for various garment-decoration methods.